April Gardening Topics
2023
- Oklahoma Pecan Growers Association Annual Meeting Registration Open - Becky Carroll,
Associate Extension Specialist, Fruit and Pecans
The Oklahoma Pecan Growers Association will be hosting their annual meeting on June 1-3, 2023, at the Cox Business Convention Center in Tulsa. We have a great slate of speakers lined up to provide content to potential or experienced pecan growers.
Be sure to reserve your hotel room by May 11, 2013. The OPGA has a block of rooms at the DoubleTree by Hilton that joins the convention center. The phone number is (855) 610-8733. Ask for the OPGA rate of $159. There are other hotels in the area if you want to stay elsewhere.
The Oklahoma Pecan Growers Annual Convention has all the details and a link to register online.
On Thursday, June 1st, registration starts at 12:30. We will then begin our mini-pecan class at 1pm. We will be offering 2 pesticide applicator CEUs for the Thursday afternoon session. Our great vendors will be set up on Thursday and Friday to be available to show the latest and greatest in the pecan world. The 2022 State Pecan Show winners will be displayed for your viewing on Thursday and Friday. Thursday evening, we will have a social. Always lots of fun visiting with old and brand-new friends.
Friday the 2nd is chocked full of pecan fun & education. Plan to bring your best pecan baked goods to enter in the pecan food show. Registration is from 7:30-10am and judging begins at 10am. Winners will receive ribbons and Grand Champions have bragging rights for another year plus some great prizes. Those Grand Champions will be auctioned off at the Awards Banquet on Friday evening to benefit pecan research. The educational program will begin at 8am. The agenda is posted online with speakers and topics scheduled for the event. The line up has something for everyone! We hope to provide another 2 CEUs on Friday.
Saturday the 3rd, we will travel to Great Buffalo Pecan Farm just about 15 minutes from the convention center for our field day and lunch. The address is 6998 North 52nd West Ave Tulsa, OK 74126.
Dewey Bartlett, Jr., and JP Bennett will share how they got started and some of the new projects that they have incorporated.
If you are interested in moderating or helping with the field day, please let me know. I can provide free registration for those educators assisting with the meeting.
Please reach out with any questions.
- Early Bloom and Freezing Temperatures mean Problems for Peaches - Becky Carroll, Associate
Extension Specialist, Fruit and Pecans
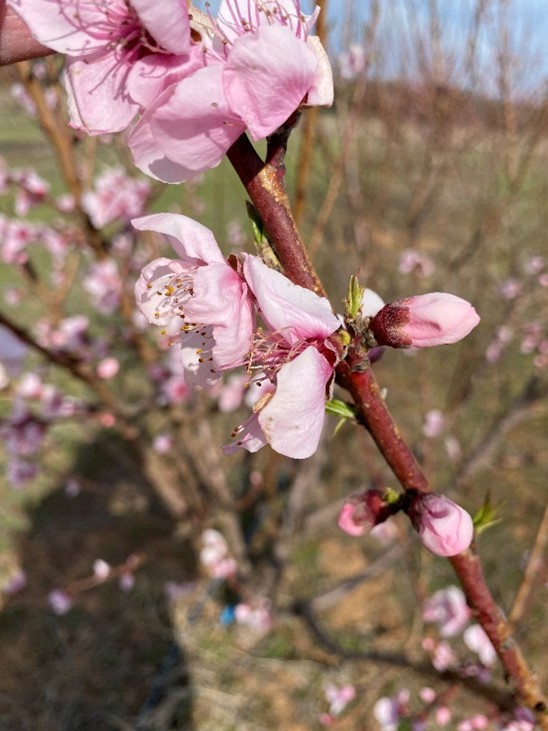
This spring, peaches and nectarines were blooming at least 2-3 weeks earlier than the average bloom date here in Oklahoma. The warmer temperatures across the southeastern US has plants waking up and starting their growth much earlier this year.
The chart below shows the critical temperatures to cause injury to peach flower buds at different stages of development. Dormant buds are safe down to -12 before injury would occur on a healthy peach tree. These temperatures are for about a 30-minute time span. Once the buds start progressing in development, they are less resistant to cold temperatures. So, a peach at first pink (or popcorn stage) can be damaged at about 25 degrees to lose 10% of the crop and 15 degrees will take the majority of buds. Those at full bloom will have some damage at 27 degrees and major damage at 24 degrees. According to the Mesonet map of low temperatures on March 19, Perkins dropped down to 15 degrees and many other areas were below that critical full bloom temperature of 24 degrees.
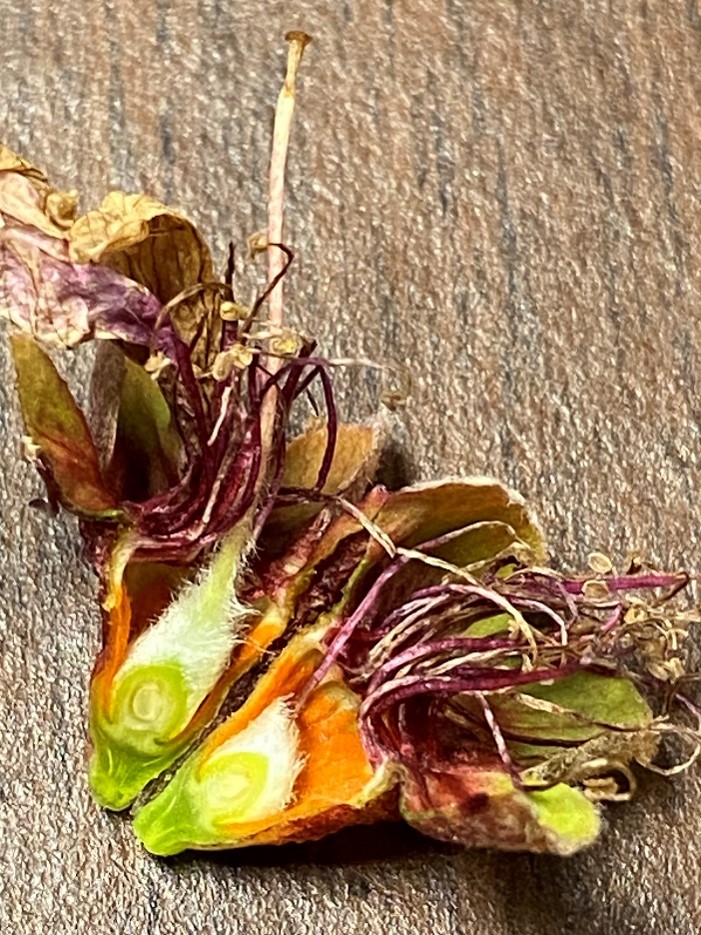
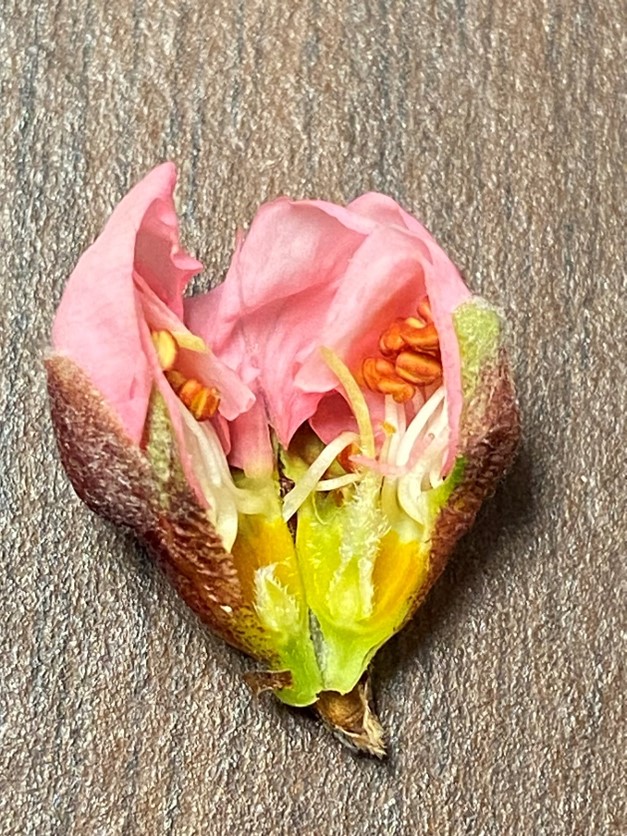
Needless to say, those flowers at full bloom showed almost immediate petal damage and dried up within a few days. Apricots, almonds and plums at full bloom were all damaged as well. Below are a few pictures of blooms that were dissected. Some buds that were at a delayed stage, may survive. Looking at a few of the flowers, specific parts were damaged, and other parts look healthy. This would not allow the flower to be pollinated properly or develop a fruit. So even if the buds still look alive, parts of the flowers could be damaged inside.

Stage 10% kill 90% kill Dormant -12 -18 Swell 18 1 Calyx green 21 5 Calyx red 23 9 First pink 25 15 First bloom 26 21 Full bloom 27 24 Petal fall 28 25 Shuck split 31 29 Ovule looks green but other flower parts both male and female are damaged.
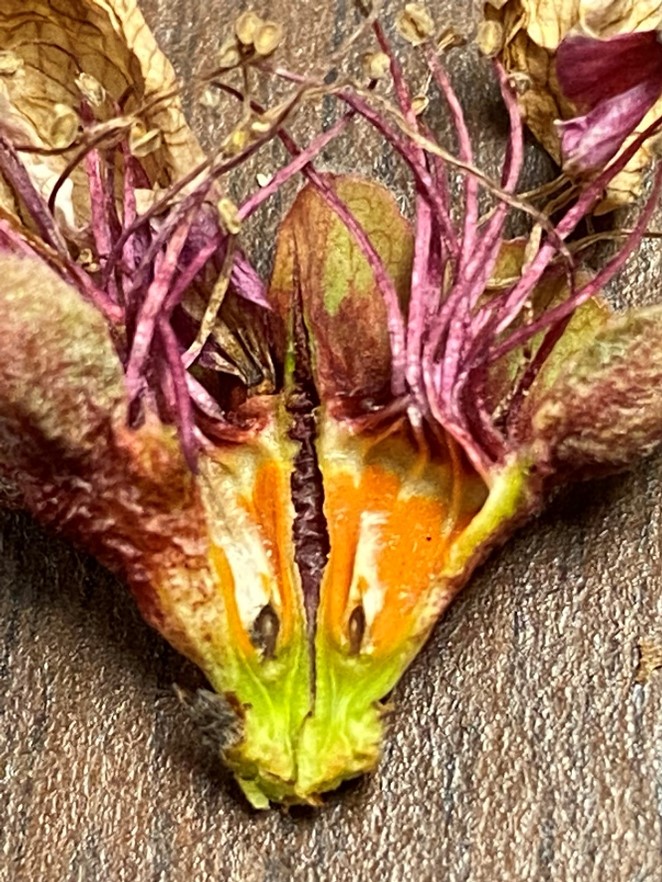
Ovary is brown indicating damage. All other flower parts are damaged.
Ovule and style look green. Stigma looks like its darkening and parts of the anthers are damaged. Some petals are remaining.
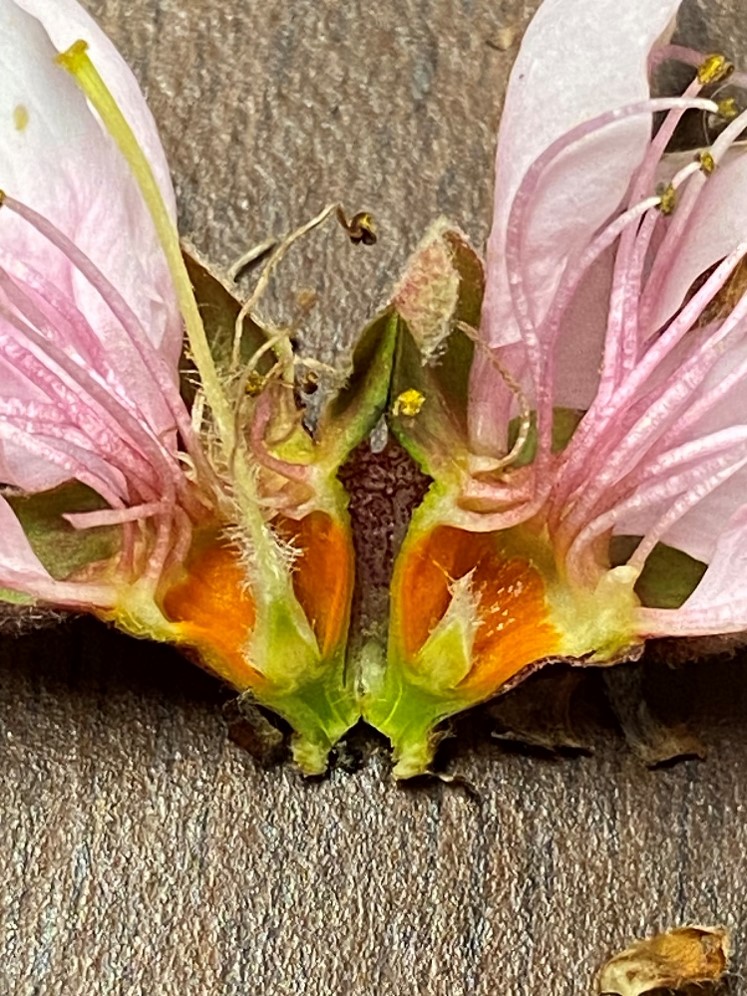
Ovule, style, and stigma look green and healthy. Hard to tell on anthers if they are damaged.
- Hardening Off Transplants - Casey Hentges, Oklahoma Gardening Host and Bailey Lockhart,
Project Coordinator
Without knowing exactly when warmer weather will finally arrive, mid-April is typically a good time to plan to place warm-season crops in the garden. The planting date can vary based on the location in the state. While the beginning of April is an appropriate planting date for southern Oklahoma, planting in the panhandle should wait a little longer. Paying close attention to the weather forecast in April will give insight as to when to plant.
Growing transplants indoors from seed means they will need to acclimate to the real world before planting in the garden. It’s like pushing your kids out of the nest and giving them some tough love, while they are still somewhat protected.
As young seedlings, everything has been provided to ensure they get the best start. While this has likely paid off by growing successful transplants, those transplants are not considered truly successful until they have acclimated and established themselves into their new garden home. Even if they are checked on daily, the natural environment will bring variable challenges from day to day for the new transplants. For example, Oklahoma winds are stronger than what they are used to indoors.
Before the transplants can go into the garden, they need to be hardened off. Hardening off is the process of exposing transplants gradually to outdoor conditions and is typically done about a week before they go into the garden. An easy way to do this is to expose them to the outside elements for short periods of time. Start by putting them outside for a few hours in the morning or in the evening. Even though they have been under bright lights such as a grow light, they will not be used to the full afternoon sun. To get them acclimated, add a little time each day until they can spend a full day outside. The same goes for the evening temperatures, however, it may still get cold in the evening. While exposure to some cooler temperatures is part of the process, don’t leave them outside on those especially cold nights when temperatures drop below 50°F. This gradual exposure will help the transplants acclimate to the sunlight, temperatures, and the wind. Another thing to take into consideration is to start reducing the frequency of watering. They will need significant watering at this stage because they are exposed to warmer conditions and stronger, drying winds. Allowing them to experience some thirst (but not wilting) between watering is likely what they will soon be experiencing in the garden. It is better to do it sooner, when they can be monitored closely rather than later, when they might get accidently overlooked in the garden.
Putting transplants outside for a few hours a day starting in the morning or evening and slowly working up to a full day is the best way to harden them off. Do not put them in direct sun right away. Instead, consider placing them under a covered porch or in the shade of a tree, while allowing them to slowly adapt to their new environment.
Hardening off your Transplants Oklahoma Gardening YouTube video
- Onion Care and Handling - David Hillock, Consumer Horticulturist
Whether in a home or market garden, onions are a favorite of many vegetable growers. If you planted onions from transplants this year, they should begin vigorous growth soon if they have not done so already. Do not overlook the need for nitrogen fertilizer for producing large onions. Unless you have a garden with very fertile soil, now is the time to apply nitrogen fertilizer to enable vigorous growth. Two possible sources are ammonium nitrate or urea. A rough estimate of how much of these fertilizers to use is ¼ of a pound for 20 feet of row. Scatter the fertilizer along the 20 feet distance so that it covers 1 ½ feet on each side of the row. Do not put the fertilizer directly on the plants and do not concentrate it at the base of the plants. Doing so could cause injury to shallow plant roots. Fertilizer can be left on the surface or scratched lightly into the soil surface. Water gently following fertilizer application.
Primary pest problems observed in onions in southeast Oklahoma in recent years include thrips, purple blotch, and black mold. There are additional pests that affect onions one should also watch for. Thrips are tiny insects that feed on the leaf surface. Heavy infestation will result in leaves taking on a silvery appearance. Thrips are most easily observed when leaves are gently separated at the onion neck. The insect will appear as tiny yellow or dark colored specks that move when disturbed. Although tiny, thrips can be very damaging to onions. Two species are commonly present: onion thrips and western flower thrips. The two species are not readily distinguished by an untrained observer. Insecticide treatment for thrips will depend on the producer’s situation. Inspect onions frequently to determine if the plants have an infestation. Contact your County Extension Office for information on insecticides to use for thrips.
Fungal diseases are another concern in onions. Healthy leaves are needed to produce an onion bulb. Diseases of the foliage can quickly destroy healthy plants. Purple blotch is one of these and it is first observed as tiny water-soaked lesions on the leaves. If conditions are suitable the lesions can enlarge and destroy the leaf. The way to control purple blotch is to use preventive fungicide applications. This means the fungicide needs to be applied before the disease is observed. The threat of this disease is greatest under rainy, wet, and humid conditions. When conditions such as these are forecast, the use of fungicide in advance of the wet weather is highly recommended. Your County Extension Office can provide information on suggested fungicides for purple blotch and other vegetable diseases.
Finally, black mold is a disease that has been observed in onions harvested in summers during a rainy period. The onion bulbs may appear normal at harvest but begins to develop a black powdery material under the dry outer scales. This is a mold that infected onions due to extremely wet conditions at harvest. Suggested control measures are to store onions at temperatures below 60. Note that storage at temperatures cooler than that provides additional benefits. Avoid bruising onions during harvesting and handling.
- Garden Planting Guide for Warm Season Vegetables - David Hillock, Consumer Horticulturist
Vegetable Time to Plant* Days to Harvest Method of Planting Bean, Lima April 15-30 90-120 Seed Beans,
Green or Wax
April 10-30 50-60 Seed Beans, Pole April 10-30 60-90 Seed Cantaloupe May 1-20 80-100 Seed or Plants Cucumber April 10-30 or later 50-70 Seed or Plants Eggplant April 10-30 80-90 Plants Okra April 10-30 or later 60-70 Seed Pepper April 10-30 or later 90-110 Plants Pumpkin April 10-30 90-120 Seed Southern Pea May 1 - June 10 85-100 Seed Squash, Summer April 10-30 or later 40-60 Seed or Plants Squash, Winter May 15 - June 15 110-125 Seed or Plants Sweet Corn March 25 - April 30 80-100 Seed Sweet Potato May 1 - June 10 100-120 Plants Tomato April 10-30 70-90 Plants Watermelon May 1 -20 90-120 Seed *These dates indicate planting times from southeast to northwest Oklahoma. Specific climate and weather may influence planting dates. For Cool Season Vegetables, the soil temperature at the depth where the seeds are planted should be at least 40°F.
- Resistance, Our First Defense to Pests - David Hillock, Consumer Horticulturist
One of our best defenses to common pest problems in the garden and landscape is plants with natural resistance. By selecting varieties of plant species, or species that are inherently resistant to common pest problems, the use of pesticides needed to keep our plants looking good can be reduced.
When buying seeds or plants, try to choose those with built-in resistance to diseases, insects, and nematodes. Sources for this information include OSU Extension Fact Sheets, seed catalogs, and plant and seed packages. It may be better to forego some production capability in favor of the increased pest resistance, if you must make such a choice.
During the growing season, stressed plants can lose their resistance to pests, so be sure the crop has the water and nutrients it needs. When shopping for seeds and plants, check the labels for indications of pest resistance. For example, many garden phlox and crapemyrtles are susceptible to powdery mildew fungal disease; however, several varieties are available that are resistant to powdery mildew. When purchasing vegetables, check labels or packaging for abbreviations like these, used to designate various types of pest resistance or tolerance:
- A—Alternaria stem canker
- ALS—angular leaf spot
- ANTH—anthracnose
- CMV—cucumber mosaic virus
- DM—downey mildew
- F—Fusarium (race 1)
- FF—Fusarium (races 1 & 2)
- L—leafspot
- MDM—maize dwarf mosaic
- N—nematode
- NCLB—northern corn
- PM—powdery mildew
- SCLB—southern corn
- St—Stemphylium (gray leaf spot)
- SW—Stewart’s wilt
- TMV—tobacco mosaic virus
- V—Verticillium
- Fertilzing Fruit Crops - David Hillock, Consumer Horticulturist
Regular maintenance of fruit-producing shrubs and vines maximizes quality and yield of fruit. A holistic maintenance program involves proper irrigation, fertilization, insect and disease management, and pruning. Plant health depends upon healthy soils and weed management. Regular disease and insect pest scouting are critical issues for many fruit crops.
Several fruit crops need to be fertilized at the start of the growing season. Fertility management is important to maintaining the health of perennial fruit crops during their life span. Because fruit crops are long-lived, it is important to assess and improve soils prior to planting. Improving soil tilth, adjusting pH, and addressing fertility needs prior to planting will result in stronger plant growth and production. Nutrients such as phosphorous and potassium do not move through the soil readily and are best managed prior to planting. Soil pH is particularly critical for blueberries, which require acidic soils. It is worthwhile to take time to adjust pH prior to planting.
Fruit crops growing in soil that was properly prepared prior to planting generally require only small additions of nitrogen throughout the life of the planting. It is important to treat each crop individually — not all fruit crops have the same nutritional requirements. Specific nitrogen requirements and appropriate fertilizer rates for each small fruit crop are outlined in OSU Fact Sheet HLA-6259 Small Fruit Fertilization and Maintenance Schedule. Rates presented in this publication represent average annual nitrogen needs for mature plants. Recommendations for fertilization of fruit and nut trees can be found in OSU Fact Sheet HLA-6232 Fertilizing Pecan and Fruit Trees. Refer to specific Fact Sheets for fertilizer rates of immature plants. Visual growth inspections will help tailor nitrogen needs. If plants are growing too vigorously, reduce nitrogen application rates. Slow growth may indicate a need for higher nitrogen rates.
Soil tests deliver more accurate nutrient requirement recommendations based on the specific growing location and are recommended every three years. Some crops require applications of macronutrients or micronutrients in addition to nitrogen. If a nutrient deficiency is suspected, conduct a soil test to determine if additional fertilizer is needed.
Consider soil characteristics and plant requirements when selecting fertilizer. For example, blueberry and kiwi crops require acidic soils (low pH) for optimum plant nutrition. Specifically, blueberries perform best in soils with pH between 4.0 and 5.5 and kiwi performs best in a pH of 5.0 to 6.5. Soil pH can be amended through applications of sulfur prior to planting (Extension Fact Sheet HLA-6248, Blueberry Production for the Home Garden). Clay soils are more difficult to amend than sandy soils. Fertilizers useful for acid-loving plants include sulfur-coated urea, ammonium sulfate and cottonseed meal.
Apply fertilizers uniformly around the drip line of the plant and one foot outward, but never near the base of the plant. Be careful to ensure fertilizer does not come in contact with the trunk or branches as this will damage the plant. It is best to apply fertilizer when the foliage is dry. Avoid getting any on the leaves. If the fertilizer does come in contact with leaves brush it away immediately. Gently work fertilizer into the soil with a rake, taking care to avoid plant roots. Apply one inch of water if rain is not expected within one or two days. Failure to work fertilizer into soils will result in loss of nitrogen to the atmosphere when air temperature is high.
Some gardeners prefer organic sources of nitrogen. Blood meal and cottonseed meal are often used as organic fertilizers. It is important to note that cottonseed meal also contains small amounts of phosphorous and potassium. Manure is often used as an organic fertilizer, but care must be taken. Only use manure from a reliable source and be sure it has been composted at least six months. Growers must also be cautious of herbicide residues in composted manure. Manure is most effectively used in pre-planting soil preparation or in fall applications. Incorporate 0.5 pounds of manure per square foot into soil or apply as a side dressing for established fruits. For vines and shrubs, spread manure in a four-foot circle around each plant, keeping the manure at least one foot away from the base of the plant. If using poultry manure, apply only 2.5 ounces per square foot.
Common small fruit crops that can be grown throughout the state include strawberries, blackberries, blueberries, grapes, elderberry, and gooseberries. Other crops are best suited for only portions of the state. Raspberries are not heat tolerant and will perform best in northeastern areas of Oklahoma. Kiwi and passionflower are best suited to wetter areas of the state in the east and southeast.
- Cucumbers and Zucchini - Getting Ahead of Pests - David Hillock, Consumer Horticulturist
Many are excited by the thought of fresh cucumbers and squash and eagerly set about planting them in the garden. But before long, enthusiasm can dwindle when the squash bugs arrive. Squash bug is the most serious pest of squash and pumpkins in the US and seems to be particularly troublesome in southern regions where it produces multiple generations per year. Their feeding behavior causes plants to wilt, yellow, and often die back, as they transmit viral infections from plant to plant. Squash bugs are by far the insect that we receive the most questions about. It is also one of the most difficult to control.
Squash bugs feed on summer squash, winter squash, pumpkins, melons, and cucumber. However, some cultivars are more susceptible than others to squash bug feeding and damage. So, our very first line of defense against squash bug damage is in the vegetable varieties we select for the garden. For example, yellow straightneck and yellow crookneck summer squash are highly susceptible to squash bug damage. Substituting zucchini for the yellow squash because it has demonstrated higher tolerance to squash bugs in numerous studies can reduce squash bug problems. However, there is one zucchini cultivar called ‘Cocozelle’ that has shown considerable susceptibility to squash bugs and should be avoided. Experiment with different cultivars of squash listed as resistant to determine which works best in your garden.
While cucumbers are also attacked by squash bugs, cucumber beetles tend to be a greater problem. Again, many cultivars are resistant to or are tolerant of cucumber beetle damage. Cucumber beetles are stimulated to feed by the chemical cucurbitacin, which is the chemical that gives some cultivars a bitter taste and causes gas in some people. Varieties listed as “burpless” or “non-bitter” contain little to none of the chemical compound and so are less attractive to cucumber beetles.
Selecting resistant cultivars is just one line of defense against squash bugs and cucumber beetles. We need to implement multiple strategies to manage these pests. Covering planted rows with floating row covers excludes both squash bugs and cucumber beetles from the plants, preventing egg-laying. The row covers must be tightly secured to the ground to exclude pests. We have used bags of sand, which are gentler on our row covers than rocks, bricks, or boards.
Cucumbers and squash are insect pollinated crops, so we must remove the row covers once plants begin flowering. At that time, hand picking insects and smashing egg masses provides additional control. You can also place wooden boards near the plants, where the squash bugs will congregate overnight. In the morning, you can lift the boards and remove the insects. The key to successful control of these pests is frequent monitoring for their presence and then taking immediate action to reduce the potential infestation.
- N-P-K and Plant Growth - David Hillock, Consumer Horticulturist
Plant growth and health is dependent on several mineral elements in the soil. Nitrogen (N), phosphorus (P) and potassium (K) are considered the macronutrients, not because they are larger than the other essential elements, but simply they are used in larger quantities by the plant. These are also the three numbers you will see on most fertilizer bags and always in that order, N-P-K.
Nitrogen is needed for the development of dark, green color in plants. It is essential for rapid and continuous vegetative growth. Of all the nutrients, N is most commonly deficient, especially when plant vegetation is removed from the area where it grew (bagging lawn clippings).
Phosphorus aids plants in getting off to a rapid, vigorous start, promotes early root formation, stimulates blooming and seed production, and hastens maturity. Phosphorus deficiency in mature landscapes and gardens is uncommon because plants use only about 1/8 as much phosphorus as they do nitrogen. Since phosphorus is also immobile in the soil, it accumulates and will be adequately supplied by soils that have a history of annual applications of phosphorus.
Potassium or potash is needed for plant health and disease resistance. It is important in ripening of fruit and helps to develop full, plump seeds. Potassium deficiency is common in high rainfall regions such as eastern Oklahoma.
Where needed and applied in required amounts, commercial fertilizers do not injure the soil. They do not poison vegetables or other plant growth. They do not destroy animal life—earthworms or bacteria—in the soil. On the contrary, the addition of fertilizer provides both plant and animal life in the soil with nutrients essential to their welfare.
Organic fertilizers or organic soil amendments may also be used. Organic fertilizers are products derived from the remains or by-products of a once-living organism. Some organic products have a nutrient guarantee, such as blood meal and bone meal, but others are sold as soil amendments with no nutrient guarantee, even though they have nutrient values.
In general, organic fertilizers release nutrients slowly and gradually because organic fertilizers
depend on soil organisms to break them down to release nutrients. An organic amendment may only release 50 percent of the total N during the first growing season. In contrast, N in commercial synthetic fertilizers is readily available. Therefore, a doubled amount of total N from an organic source needs to be applied to supply the needed N. During cold, wet periods, organic sources may not be able to supply the needed nutrients to a plant because the microorganisms that break it down are inactive. During these times if there is a need for nutrients then supplementing with synthetic fertilizers may be needed to meet the demands of the plants.
To make sure your plants have the required nutrients to encourage lush and vigorous growth and production have your soil tested every few years. Soil tests can be conducted through your County Extension Office. For more information on improving soil fertility and taking soil samples see fact sheets HLA-6007 Improving Garden Soil Fertility and PSS-2207 How to Get a Good Soil Sample.
- Feeding the Birds - David Hillock, Consumer Horticulturist
Supplying bird feeders in the landscape will create additional opportunities to watch birds feed. Place bird feeders where they can easily be seen from the house and enjoy the activities of the birds. Keep feeders stocked. Shrubs or trees should be no closer than 10 feet so birds can escape in case of danger.
Bird feeders should be cleaned regularly. Diseases can grow in wet and moldy seed, in bird droppings, and in warm sugar water. To clean your feeders, soak them in warm soapy water and thoroughly scrub with a brush or rag. Thoroughly rinse all parts. To make sure they are thoroughly clean and free of any potential diseases you can soak your feeders for a few minutes in a bleach solution of nine (9) parts water to one (1) part bleach. Remove from bleach solution and thoroughly rinse all parts, let the feeder dry completely before refilling with fresh food. It is a good idea to move your feeders each season to give the ground underneath time to break down the seed debris and bird droppings or rake up the seed debris and place it in the compost pile.
Seed feeders are visited by cardinals, juncos, sparrows, chickadees, finches, mourning doves, blackbirds, squirrels, chipmunks, and others. Fruit feeders (wedges of oranges, apples, bananas) are favored by orioles, bluebirds, towhees, woodpeckers, tanagers, brown thrashers, catbirds, and robins. Nectar feeders attract hummingbirds, orioles, and occasionally a variety of other seemingly unlikely birds such as woodpeckers and chickadees.
- Purple Martin Houses - David Hillock, Consumer Horticulturist
Purple Martins are one of America’s most well-loved songbirds for many reasons; their chattering song, aerial acrobatics, insect-eating habits, and their tolerance of humans. They are gregarious birds that typically live in large colonies, and they are the only bird in North America east of the Rocky Mountains entirely dependent upon human-supplied nesting cavities. The adult male birds are a dark, steely-blue color, with black eyes and beak. Females are brown-gray above and have a lighter colored breast. They belong to the swallow family of birds.
There are many different styles of martin houses available in a diversity of building materials. Purple Martin houses are built of wood, aluminum, or plastic. In Oklahoma, where summer temperatures often soar, wood is the best house material. Wood provides better insulation for the purple martins against extreme heat. Wooden housing should be made from untreated material only. Lumber of 3/4” stock will provide better insulation against heat and cold. Cedar, cypress, pine, or redwood work well.
Plastic and aluminum houses are much less expensive than wooden houses. Plastic housing should be of thick, UV-resistant material and should not allow light to filter through. Transparency creates a “greenhouse effect”; this heat can be harmful or deadly for nestlings. A layer of insulation in the attic of plastic or metal housing will protect martins during periods of extreme temperatures.
The following information from The Purple Martin Conversation Association will help guide you in selecting and building a martin house.
Your chances for success will be better if your housing is easy to manage. Choose a pole that telescopes, or is equipped with a winch or lanyard, and housing that has easy access to compartments. Avoid housing that only allows access by removing the roof, or layers of the house, or through entrance holes. Paint houses white or a light color. White housing attracts martins best, and reflects sunlight, keeping nestlings cooler.
Compartment floor dimensions should be at least 6" x 6" but larger compartments (7" x 12") are preferred by the martins and offer better protection from predators and rain. Larger compartments are also attractive to European Starlings, but a special entrance hole will minimize starling problems. Height of compartments can be 6" or 7". Place entrance holes 1" above the floor. An entrance hole of 2 1/8" is preferred by the martins, but they will use a range from 1 7/8" to 2 1/4". Make sure there is adequate ventilation and drainage in each compartment. Many plans for martin housing, and some manufactured houses, are made to incorrect dimensions, so if your housing is unsuccessful, check the dimensions and modify where necessary.
Most houses can be improved. Add insulation to the attic, remodel interiors to offer double-size compartments, and add porch dividers. Dividers help keep males from claiming extra compartments and can double occupancy rates. They also keep nestlings from wandering to other compartments, where they can get lost and die, or steal food from younger nestlings, causing them to starve.
Location, location, location! Choosing the right location for your martin housing is one of the most important steps in attracting Purple Martins. Martins prefer open areas with clear flyways around their housing. Choose the center of the largest open spot available, about 30-120 feet from human housing and at least 40-60 feet from trees.