February Gardening Topics
2023
- 2023 Pecan Pest Management Workshop - Becky Carroll, Associate Extension Specialist,
Fruit and Pecans
Native or Improved pecan growers looking for ways to improve their pest management and acquire private applicator CEUs will want to take part in the upcoming workshop. February 21, 2023 is the date of the event and begins with sign-in at 8:30am. The Gordon Cooper Technology Center in Shawnee has offered their site for the group. There is no charge to attend but growers are required to register.
Lunch will be on their own. Those attendees with a private pesticide applicator license can earn 5 CEUs for categories 1A, 10 and private applicators. They will need their applicator number for credit. Door prizes will be awarded during the event.
Extension educators are encouraged to attend for in-service credit.
Here is the agenda with presentations and speaker information.
- 9:00 - Welcome & Introductions – Becky Carroll & Trent Boles
- 9:15 – 9:45 - Pecan problems? How the PDIDL can help. - Jen Olson
- 9:45 – 10:15 – Weed Control Strategies in Pecan - Mike Trammell
- 10:15 – 10:30 - Break
- 10:30 – 11:30 – Label Language: Mandatory, Advisory or Factual – Kevin Shelton
- 11:30- 1:00 – Lunch on your own
- 1:00 – 2:00 – Hickory Shuckworm & Pecan Weevil Trials – Kelly Seuhs
- 2:00 – 2:30 – Diseases You Can Expect in Pecan Orchards - Charlie Graham
- 2:30-3:00 - IPM Principles: Advancing your Knowledge for Better Results– Charles Rohla
- 3:00 -3:15 - Break
- 3:15 – 4:15 – New Sprayer Technologies - John Long
- 4:15 – Wrap-up and questions
If you have other questions concerning the workshop, please contact Becky Carroll at becky.carroll@okstate.edu.
- Direct Sowing Cool Season Crops - Casey Hentges, Associate Extension Specialist and
Bailey Lockhart, Extension Assistant
A lot of gardeners are anxious to get back out into the garden this time of year. While much of the garden is still sleeping, planting cool season crops can slowly wake it up.
Cool season crops are plants that prefer temperatures below 70 degrees. One easy way to determine whether a plant is a cool season or a warm season crop is to think about which part of the plant is intended for harvest. If it is a root, stem, leaf, or flower such as carrots, lettuce, and broccoli, it is probably a cool season crop. Alternatively, if it is the true fruit of the plant that comes from the flower, such as a pepper, tomato, okra, corn, and watermelon, then it is probably a warm season crop. This makes some sense because the first thing produced on a growing plant are the roots, stems, and leaves, while the last part is typically the fruit. However, this is just a general guide and not at all a hard and fast rule. For example, peas are a fruit, but are a cool season crop; and sweet potatoes are a root, but they are a warm season crop that is harvested in the fall.
The weather this time of year can be unpredictable, but luckily many of our cool season crops are hardy to frost. Freezing temperatures means the plants need some additional insulation and protection. Typically our Oklahoma freezes don’t last very long, so it might just mean covering the plants overnight. By direct seeding these plants now in February, the plants will be able to take advantage of the warm days and allow for the harvest of some fresh lettuce soon.
Lettuce and spinach take about 7-14 days to germinate but will provide a crop ready to harvest in about 45 days. Some varieties will be ready to harvest much sooner.
Make sure the planting area is prepared to direct sow the cool season seeds. If planting in a garden that was used previously, make sure all the old material has been removed and the surface has been raked to provide a nice fluffy soil to sow the seeds. If your soil profile has shrunk over the season in your raised bed, consider adding more potting media before planting.
When looking at the seed packet, it is often tempting to plant all the seeds in the packet. This will give a family a decent harvest, but one person may not care to eat all the lettuce as it becomes ready and therefore may go to waste or need to be given away. Another alternative to planting all the seeds at once is to succession plant. This is planting seeds a little at a time, and then a week or two later plant some more. This will spread out your crop harvest, allowing for enjoyment of fresh greens over a longer period of time.
A few other cool season crops to add into the garden are carrots, beets, and radishes. These are some of the easiest plants to grow and are perfect for the beginner gardener. If the garden soil is made of heavy, rocky clay, raised beds are a great option. Carrots are a great example of a plant that would do better in a raised bed than heavy garden soils because they have a longer taproot. Rocky soils can cause carrots to split, although they are still edible.
Because these cool season crops are easy to grow, they make the perfect backyard or patio plant to introduce kids, or anyone, who may want to try gardening. Another benefit of cool season crops is they don’t have many of the pest and disease problems that gardeners deal with during the warmer months.
Starting cool season crops can be as simple as getting a pot, filling it with some potting media and planting seeds on top. Since kids typically have a short attention span, doing this project can give children something to care for, but also will provide a tasty reward.
- Weed and Feed Products - David Hillock, Consumer Horticulturist
The concept of combining an herbicide and a fertilizer to “kill two birds with one stone” may be good in theory but may not work in every situation. Several potential problems exist when using this approach.
The first is that the timing for herbicide application and fertilizer application are usually not in sync. Some weed and feed products contain preemergence herbicides that control weeds as they germinate and are best applied before late February depending on weather conditions. Fertilizer applications for warm season grasses such as bermudagrass should not go on until the first of May. See the problem?! The two really need to be applied at different times; so, using a weed and feed blend on bermudagrass in later winter/early spring is not advised.
Second, the selection of formulations for weed and feed blends is much more limiting than if one were choosing only a fertilizer. Fertilizer formulations are much more diverse because fertilizer companies make many more types. Most companies that produce weed and feed products only make one type, not allowing one to consider special nutrient needs that may have shown up in a soil test, i.e., a need for less or more phosphorus. Once again it is obvious that the best approach would be to apply weed killer and fertilizer separately. (Note also: Types of weed killer used in weed and feed blends is also limited compared to the many formulations available without fertilizer.)
Third, there is more chance of over-application or misapplication of the weed killer. Because tree and shrub roots can also absorb many of the herbicide products, care in applying the herbicide is very important. In fact, many of the herbicide products state that they should not be applied where roots of desirable trees or shrubs are growing. Research has shown that the roots of many tree species extend well beyond the dripline of a tree. So how does one apply an herbicide to turf areas with trees growing in or near them? By using separate fertilizer and herbicide products and avoiding weed and feeds. Another common problem is overthrow of the product into areas that have sensitive plants growing in them such as flower and shrub beds. This is usually a result of using the wrong equipment such as the use of a broadcast spreader rather than a drop or gravity spreader. Once again, it makes good sense to apply products separately allowing for more accurate rates and distribution.
And fourth and last, why treat healthy grass with something it does not need and could potentially weaken it? By the way, a weakened turfgrass is more likely to have weed problems. Spot treat only the weed prone areas.
The real way to address weed problems is to start with improving turf management. A vigorous, healthy lawn can choke out most weeds. For information on recommended turfgrass management practices see HLA-6420 Lawn Management in Oklahoma.
- Fertilizing Asparagus -David Hillock, Consumer Horticulturist
Asparagus is a wonderful spring vegetable requiring minimal maintenance. To promote a good crop, fertilizer needs to be applied to the crop twice each season, once in late February or early March and again at the end of the harvest season. The first fertilization stimulates shoot development and the second feeds the growth of ferns. Promoting vigorous fern growth will replenish the energy reserves in the roots for next year’s harvest.
Before applying fertilizer, remove last year’s dead ferns and move those to the compost pile. Apply a side dressing of fertilizer. Side dressing means applying the fertilizer to the soil around the plant, keeping the fertilizer from contacting the plant directly. Generally, nitrogen only is needed, which is the first number listed on a fertilizer bag. Only apply phosphorus and potassium if a soil test indicates a nutrient deficiency.
The fertilizer is applied at a rate of about one half to one pound of actual nitrogen per 50 square feet. As an example, a bed about 25 square feet, would need one-quarter to one-half pound of actual nitrogen. An organic source of nitrogen in the form of blood meal has a nutrient content of 12-0-0. This means nitrogen makes up 12 percent of the fertilizer by weight, or .12 pounds of nitrogen per pound of fertilizer. If the goal is to apply ¼ pound of nitrogen to the 25 square-foot asparagus bed, 2 pounds of blood meal will need to be applied.
- Applying Dormant Oils for Winter Insect Control - David Hillock, Consumer Horticulturist
For home gardeners and fruit growers an important insect management tool is dormant oil application. Dormant oil is a refined petroleum product formulated for use on trees and shrubs. This refers to the time of application which should be late winter or early spring. Applications should be made when temperatures are above freezing and before bud swell and bud break before new growth forms. Ideal temps are between 40 and 70 degrees.
If applied too early, before hardening off, the trees can sustain winter injury. Also, if the temperature is too low the oil will not mix well in solution, and you will not get adequate coverage needed to control overwintering insects. Late February through March should be a good time to make these applications, although check the weather and make sure there will not be any freezing temperatures or rain for a few days after applications.
Dormant oils control scale insects, aphids, and mites that are overwintering on the trees. The oil must be applied with enough water to get thorough coverage (read label recommendations). Coverage is very important so that the spray can reach in between the cracks and crevices of the bark where many insects hide. The oil coats the insects and fills the spiracles. Insects use their spiracles to breathe so when they are blocked, they smother. Dormant oils will suppress insects by killing overwintering adults and eggs which will slow the seasonal build up in the spring. This is well worth the extra time. Some insects controlled by dormant oils include aphids, scales, and mites.
Applications should be made to apples, pear, plum, pecan and crabapples. Peaches, nectarines, apricots and plums often do not require dormant oil sprays, but if certain insect pests have been an issue in the past, it could be beneficial. Dormant oils can also be beneficial for shade trees and woody ornamentals. Consult your label before application to make sure the plant is listed. Some plants are sensitive to dormant oil applications.
Precautions: Do not apply too early or too late. Avoid temperature extremes. Avoid using on plants that are oil sensitive. There will be a list on the label.
Dormant oils will kill annual flowers; do not make applications to trees close to annuals. Do not apply in combination with sulfur containing pesticides such as captan. This will cause plant injury.
Benefits far outweigh the negatives. It is inexpensive. Less toxic than other sprays used to control these pests with little toxicity to birds and mammals. This will provide your plants with a jump start into spring.
Dormant oils can be purchased at any garden center and are relatively inexpensive. Remember to read the label and follow all label recommendations!
- Starting Seeds Indoors - David Hillock, Consumer Horticulturist
Many gardeners choose to start their own seeds at home, rather than purchasing transplants. The advantages include savings in cost, and the availability of a much wider selection of cultivars. You can also time seed sowing according to your expected planting date so that transplants are ready when you need them. Of course, planting seeds and tending seedlings is also a great way to spend a winter day.
You can start seeds in flats purchased from a plant supply company or garden center, you can use expandable peat pots, or you can use a variety of household items. When selecting a container to start your seeds, consider drainage. You do not want water sitting in the bottom of the container. You also want to make sure the container holds enough media that it will not dry out too quickly and will have plenty of room for roots to develop.
The potting media you use is also important. Often you can find a media labeled specifically for seeding. Look for media with both good drainage and high water holding capacity. These things seem contradictory, but you want your soil to hold adequate moisture for seeds to germinate without drying out too quickly, but you also want excess water to freely drain from the medium.
Light is often a limiting factor with starting seeds indoors. To produce hardy seedlings, you need 12 to 14 hours of light per day. Natural lighting is generally not enough. Supplement natural light using a shop light with alternating cool- and warm-white fluorescent bulbs.
To plant the seeds, sow in rows 2 to 3 inches apart. Use a fairly tight spacing within the row. As a rule, sow seeds to a depth of approximately 3 times the diameter of the seed. Most seeds will germinate well at a temperature around 70 degrees F held constant during day and night. After germination, temperatures can be lowered according to the type of plant you are growing. Refer to OCES Fact Sheet HLA 6020, “Growing Vegetable Transplants” for ideal growing temperatures. For many tomatoes, a day temperature between 70- and 80-degrees F and a night temperature between 60 and 65 degrees F is ideal.
Managing water in seed trays can be tricky. Over-watering is a common problem. The seeds do not use much water until they have germinated, and seedlings are actively growing. However, the seeds need moisture to germinate. Misting the soil until it is thoroughly damp is a good way to provide moisture. Then, cover the seed tray loosely with plastic, checking soil moisture periodically. Remove the plastic once you see seedlings emerge.
Though fertilizer labels recommend weekly fertilizer applications, an application every two to three weeks is usually sufficient. The first application is not needed until seedlings are ready to be transplanted, two to three weeks after sowing.
- Fresh Spring Vegetables - David Hillock, Consumer Horticulturist
The days for fresh vegetables to be picked right from the garden are soon coming. The cold winter temperatures will soon be leaving allowing us to return to the garden and begin growing our favorite vegetables again. By February 15 many cool-season vegetables like cabbage, carrots, lettuce, peas, and potatoes can be planted (see chart). The exact time to plant will vary slightly depending on the winter and where you live in the state. The south/southwest region could be as much as two weeks ahead of the northwest and panhandle areas of the state. The thing to remember though is that soil temperatures at planting depth should be at least 40°F.
The ease with which one can grow plants is greatly influenced by characteristics of the soil. Modifying or improving the soil prior to and during the gardening season is important.
Garden Planting Guide for Cool-Season Vegetables
Vegetable Time to Plant* Days to Harvest
Method of
Planting
Asparagus Fall or Spring - Crowns Beets March 50-70 Seed Broccoli March 80-90 Plants Cabbage Feb 15 to Mar 10 60-90 Plants Carrot Feb 15 to Mar 10 70-90 Seed Cauliflower Feb 15 to Mar 10 70-90 Plants Chard, Swiss Feb 15 to Mar 10 40-60 Seed Kohlrabi Feb 15 to Mar 10 50-70 Seed Lettuce, Head Feb 15 to Mar 10 60-90 Seed or Plant Lettuce, Leaf Feb 15 to Mar 10 40-70 Seed or Plant Onion Feb 15 to Mar 10 60-120 Sets Onion Feb 15 to Mar 10 60-120 Plants Peas, green Feb 15 to Mar 10 60-90 Seed Potato, Irish Feb 15 to Mar 10 90-120 Tuber pieces
2-3 oz.
Radish Mar 1 to April 15 24-40 Seed Rhubarb Fall to Spring - Crowns Spinach Feb 15 to Mar 10 50-70 Seed Turnip Feb 15 to Mar 10 50-60 Seed *These dates indicate planting times from southeast to northwest Oklahoma. Specific climate and weather may influence planting dates. For cool-season vegetables, the soil temperature at the depth where the seeds are planted should be at least 40ׄ°F.
Various fertilizer elements are necessary for plant growth and many can be easily applied. However, other aspects of soil improvement may not be as easily and readily accomplished. In a very sandy soil, the incorporation of organic matter would reduce rapid drying of the soil and improve nutrient availability. In a very heavy clay soil, organic matter would improve soil aeration, water absorption, and drainage.
Soil should absorb water readily, not form a crust upon drying, and drain sufficiently so that it does not become waterlogged. A porous soil contains more air, which is necessary for vigorous root growth. As organic matter decomposes, soil texture improves, and nutrient availability should increase. More information on garden soil improvement is given in fact sheet HLA-6007 – Improving Garden Soil Fertility.
The soil must contain a supply of water and available fertilizer nutrients. Soils that produced a vegetable crop the previous year will be more easily managed than those with established grasses and weeds.
Additional fertilizers may be beneficial to stimulate growth and production. These might be incorporated in the soil prior to planting or applied on the soil surface later.
- Soil Testing . . . the Right First Step - David Hillock, Consumer Horticulturist
We all appreciate thick green lawns and lush productive gardens around the home. After all, attractive lawns and gardens add to both the aesthetic value and real value of our homes.
To achieve a high level of lawn quality and garden productivity, it is necessary to add fertilizer on a timely basis. When lawns and gardens don’t receive the amount of fertilizer that they need, they never achieve the quality or productivity we anticipate. When too much fertilizer is applied, nutrients are wasted and pose a threat to the environment.
The true value of a soil test is to help ensure that only needed nutrients are added in quantities which don’t adversely affect environmental quality.
The best time to test the soil is during a time when plants aren’t growing, although any time of year is satisfactory. In any case it is better to have the soil tested rather than guess which fertilizers to use and how much to apply. To make sure the test is accurate, sample the soil before fertilizer has been applied and follow proper collection procedures.
A soil test is only as good as the sample submitted for testing. Samples collected should represent the lawn or garden as a whole. The following steps will help in collecting good samples for submission.
- Scrape plant debris from the soil surface before sampling.
- Sample lawns to a depth of 3-4”. Sample gardens to a 6” depth.
- Use a clean bucket or other container and a soil probe or spade; collect cores or slices of soil from at least 15 different areas scattered throughout the lawn or garden and mix them together in the container.
- Mix soil thoroughly and fill the sample bag (bag can be obtained from your OSU County Extension Office) with a pint of the mixture.
- Submit samples and completed information sheet to your OSU County Extension Office. They will send samples into the OSU Soil, Water, and Forage Laboratory for testing and then help you interpret the results.
The benefits of soil testing are many – it takes advantage of nutrients already in the soil, identifies nutrients that are lacking, reduces fertilizer applications, provides a proper balance of plant nutrients, allows adjustment of soil pH to an optimum level, and reduces chances of excess nutrients getting into the water sources.
For more information about soil testing contact your OSU County Extension Office or pick up the leaflet L-249 Soil Testing…the First Right Step.
- Planting Bare-Root Trees and Shrubs - David Hillock, Consumer Horticulturist
Bare-root plants can be purchased in winter and should be planted in February or March. Bare-root or packaged plants should be dormant (not showing new growth). The bare-root plant is often prepackaged in a colorful bag. Open the bag immediately and dampen the roots until planting. At planting remove all bags, strings, or wires.
Never leave roots exposed to air. Very fine root hairs, which are not visible to the naked eye, are responsible for moisture and nutrient uptake and are killed when exposed to dry air for even a very short period. Keep the roots damp and covered while preparing the planting hole to protect the fine root hairs.
Trees and shrubs should be planted at the same depth at which they were growing in the container or field nursery. There is a texture and color change between the trunk or stem and the roots. The base of the plant should not be covered with more than about one inch of soil. Planting too deep is a major cause of plant failure, especially in poorly drained clay soil.
Holes for bare-root plants should be dug large enough to accommodate the roots without crowding or twisting. The hole should be no deeper than the original root depth and at least twice the spread of roots. Broken and badly damaged roots should be removed. A mound or cone may be made in the center of the hole to accommodate the spread of roots and allow the tree or shrub to rest at the proper depth while backfilling the hole.
- Pruning Grapevines - Aaron Essary, Assistant Extension Specialist, Viticulture and
Enology
Late February to early March is usually the time to prune grapevines in the Northern hemisphere for the upcoming growing season. The tricky part about pruning grapevines is determining when Winter is over and when Spring is about to begin. Pruning to early may result in early bud break, in which the tinder green-growing shoots could be destroyed by a late Spring frost. Wait to late to prune, and the grapevine will begin to break bud on last year’s dormant canes which expends the plants energy and will result in less fruitful production. The key is to prune right in that sweet spot of late Winter/early Spring, and hope that no April frost will come.
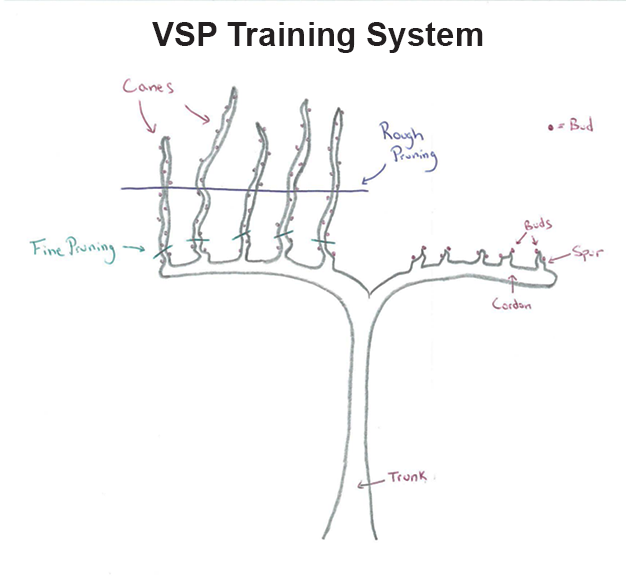
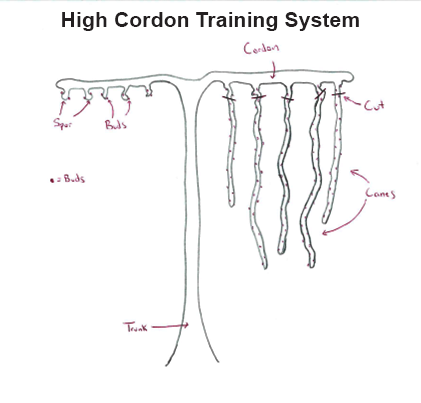
When pruning a grapevine, it’s helpful to use the philosophy of “rough prune, fine prune”. A “rough prune” is cutting all old dormant canes about 6 buds above the base. Afterwards, follow up with a “fine prune” in which you deliberately count buds per spur and spurs per cordon. If pruning for fruit production (as opposed to visual aesthetics) it’s recommended to prune to 2 or 3 buds per spur and 5 or 6 spurs per cordon.
Grapevine anatomy:
A trained grapevine grown on a trellis will likely have a trunk, two cordons (arms), 5 or 6 spurs per cordon, and then 2 or 3 canes per spur. This is how grapevines are usually trained for wine production.
Trunk – The base of the grapevine.
Cordon – Lateral growing structures to which all growing shoots are derived.
Spur – A semi-permanent structure to which the current season shoots will arise.
Cane – An active (or dormant) growing shoot.
Bud – A dormant, potential growing shoot.
Below are illustrations of pruning grapevines on either a High Cordon trellis or a Vertical Shoot Position (VSP) trellis. It is also a good idea to disinfect pruners with Lysol before cutting. After pruning, dispose of all cut canes by either raking and burning, shredding, or incorporating them into compost. Applying a post-prune fungicide will help with diseases pressures on open cuts too.
VSP Training System
High Cordon Training System
- How are Chilling Hours Adding up for 2023 - Becky Carroll
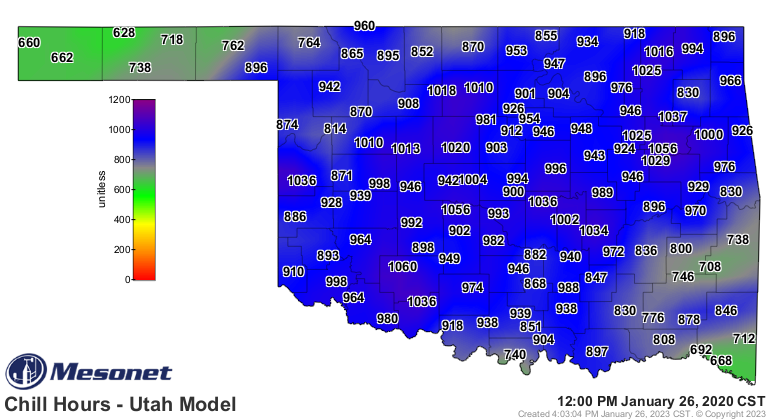
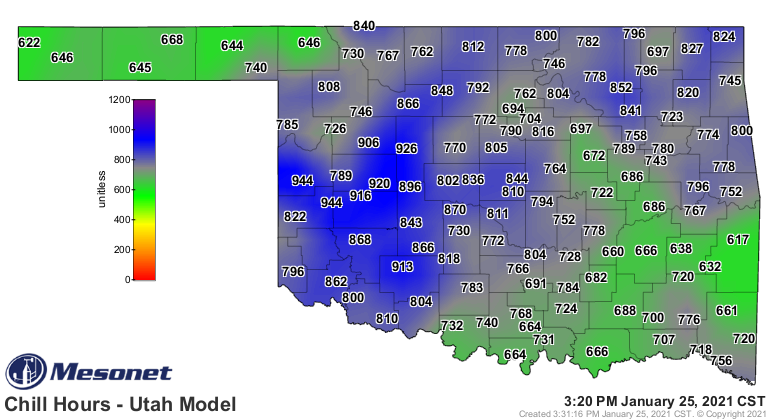
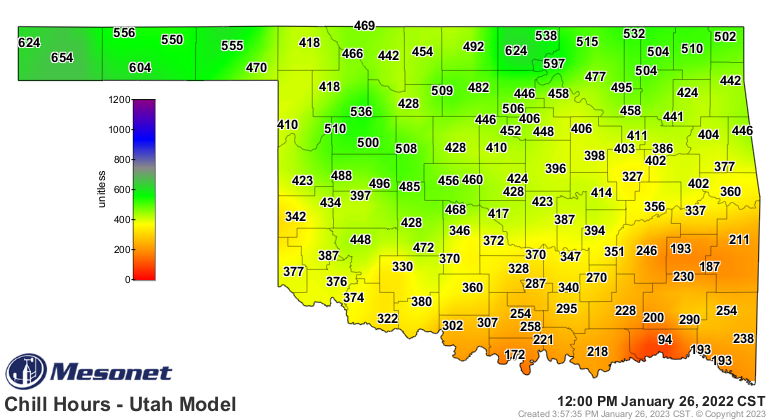
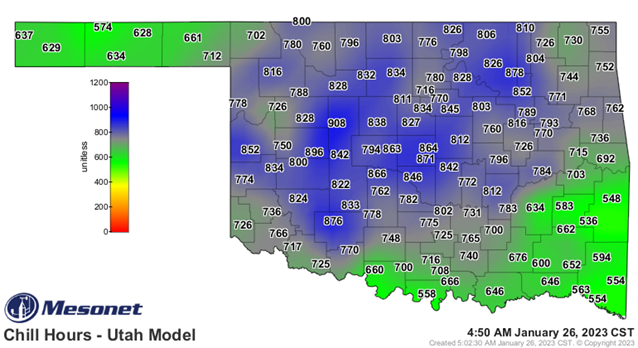
This January has been warmer than average for the month. Most days have recorded above average temperatures until recently. That would make some worry about the number of chilling hours that we are receiving. Highs have been above 60 degrees many days approaching 70 degrees in some areas early in the month. When temperatures are above 60 degrees, those hours are subtracted from the accumulated total. Good part of this year is we have accumulated many of those “sweet spot” chilling hour temperatures between 36-48 degrees. In fact, for Perkins, Oklahoma, we’ve accumulated over 845 hours since our first hard freeze. Last year on this date, we were lacking chilling hours with only 448 hours and ended up the season with less than half of normal causing issues with bloom on several fruit crops like blueberry, apple, and pear.
Remember different fruits and pecans need a specific number of chilling hours to break the rest period and begin growth properly in the spring. Some plants like figs need very few to no chilling hours while others like apples or cherries require sometimes as much as 1000-1200 hours. That is why apples don’t grow well in southern states. This rest period protects the flower and leaf buds from opening too early. Once that dormancy is broken, they start acquiring heat units to begin the growth process.
I’ve included maps from 2020, 2021, 2022, and 2023 to view. We are still lacking in the southeastern counties and hope not to repeat those low chilling hours again. We would like to see at least about 800 hours or more all along the red river in March. I’ll keep an eye on numbers with Wes Lee and Mesonet’s assistance and will update on the OSU Extension Fruit Management Facebook page. I will also post in March to show where we ended.
- 2023 Oklahoma Proven Selections - David Hillock, Consumer Horticulturist
Each year a set of plants is chosen by horticulturists that will help consumers choose plants appropriate for Oklahoma gardens. The program began in 1999 by selecting a tree, shrub, perennial and annual worthy of Oklahoma landscapes. The selections for 2023 are listed below. To see all the plants recommended by the Oklahoma Proven Plant Selection Program, visit our web site for Oklahoma Proven.
Tree – Acer buergerianum, Trident Maple
Acer buergerianum commonly called trident maple or three-toothed maple is native to China, Korea, and Japan. It is an attractive, small, rounded, deciduous tree that typically grows rather slowly to 20-25’. This tree tends to grow as a multi-stemmed, low-branching specimen, but it can be pruned to a single stem. Triangular, three-lobed leaves are glossy green above and pale green beneath. It has interesting flaky bark revealing an orange-brown inner bark on mature trunks. Variable but usually attractive fall color features shades of dark red and orange.
Easily grown in average, medium moisture, well-drained soils in full sun to part shade. Best in full sun. Tolerates some drought, soil compaction, and air pollution making it a possible specimen for street plantings in urban areas.
No serious insect or disease problems.
- Exposure: Full sun to part shade
- Soil: Prefers moist, well-drained
- Hardiness: USDA Zone 5-9
Shrub – Ilex verticillata, Winterberry Holly (Dwarf cultivars – ‘Little Goblin’, ‘Berry Poppins’, ‘Red Sprite’)
Common winterberry is a native of Eastern North America and is a deciduous holly that does not have sharp teeth on the leaves like other hollies. The inconspicuous flowers are followed by dense clusters of bright red berries that remain on the branches throughout winter providing a spectacular winter display. Winterberry is a globular, upright, medium-sized shrub, typically 6-10 ft. tall (to 20 ft. in some circumstances), but dwarf cultivars have been developed which are perfect for small spaces as well as containers.
Dwarf Cultivars
Red Sprite grows 3 to 5 feet high and has greenish-white blooms in late spring and early summer followed by the vivid red berries in early autumn lasting well into winter (Jim Dandy is a male pollinator). Berry Poppins® (I. verticillata ‘FarrowBPop’) grows 3 to 4 feet high and wide and produces a heavy display of bright red berries (Mr. Poppins® is a male pollinator). Little Goblin® Red (I. verticillata ‘NCIV1’) and Little Goblin® Orange (I. verticillata ‘NCIV2’) also grow to 3 to 4 feet high and wide and produce loads of extra-large red or orange berries (Little Goblin® Guy is a male pollinator).
Extremely showy in late fall and early winter when covered with their bright red fruit, these shrubs are either male or female--a trait typical of the holly family. At least one male for every five to nine females is recommended to ensure fruit. Birds are readily attracted to the fruit. Since this shrub grows in both wet and dry sites, it is an adaptable naturalizer and is a choice for a rain garden. These dwarf varieties are great for small hedges, a cutting garden, mass plantings, and containers.
Winterberry tolerates poor drainage and is quite winter hardy. You must have both a male and female plant to have berries.
- Exposure: Full sun to part shade
- Soil: Moist, acidic, but tolerant of light and heavy soils and wet conditions
- Hardiness: USDA Zones 3-9
Perennial – Malvaviscus arboreus var. drummondii, Turk’s Cap
This native, often growing as broad as high, grows 2-3 ft. high (sometimes higher) and 3 to 5 ft. wide. The species has bright-red, pendant, hibiscus-like flowers that never fully open with petals overlapping to form a loose tube said to resemble a Turkish turban, hence its most common name, Turk's Cap. Red flowers usually are produced in showy profusion during hot weather at the end of summer and early fall. White- and pink-flowered cultivars have been produced as well as a variegated form. Turk’s Cap is a good ornamental for shady sites.
Under cultivation, Turk’s Cap will adapt to and thrive in many different sites, including full sun and heavy soil, though unremitting sun will cause its leaves to become rougher, smaller, darker, and puckered. It is tolerant of sandy, loamy, clay, and limestone soils. Moist, well-drained, woodland soils are best. It is very drought tolerant once established. Though it will grow in full sun it prefers partially shady sites. To keep it at a desirable height and shape, prune back after a couple years.
Good nectar plant for hummingbirds, butterflies, moths, and other insects, Fruit are attractive to birds and mammals. The fruit is edible either raw or cooked, tasting rather like apple, hence its Spanish name, Manzanilla (Little Apple).
- Exposure: Part shade to sun
- Soil: Moist, well-drained soils
- Hardiness: USDA Zone 7-10
Annual – Plumbago auriculata, Cape Plumbago
Plumbago auriculata, commonly called cape leadwort or cape plumbago, is native to South Africa. It is a weak-stemmed perennial evergreen shrub that grows 6-7’ tall and 8-10’ wide in its native habitat but is treated as annual in Oklahoma and generally reaches only 2 to 4 feet high and wide each season. Cape plumbago can be grown in containers and moved indoors during the winter. Treated as an annual it more typically grows 1-3’ per year and is often kept relatively compact through periodic pruning and/or a hard annual pruning if grown in a pot and moved indoors during winter. Clusters (terminal racemes) of pale sky-blue phlox-like flowers bloom freely throughout the growing season. ‘Alba’ is a white flowering form, ‘Imperial Blue’ produces large clusters of deep sky-blue flowers, ‘Monott’ has huge clusters of vivid deep blue flowers. Flowers attract butterflies.
It grows best in organically rich, fertile, well-drained soils in full sun to part shade. Site in locations protected from strong winds. During the growing season, it does best in consistently moist soils, but established plants are moderately drought tolerant. When overwintering as a houseplant, bring indoors before first fall frost to a bright sunny room. Cut back stems hard in late winter to encourage new growth for the coming season. When overwintering as a dormant plant in a container, cut stems back and store in a cool, dry, dark corner of a basement or frost-free garage.
- Exposure: Full sun to shade
- Soil: Moist, well-drained soil
- Hardiness: Use as an annual
For more information about Oklahoma Proven contact David Hillock, 405-744-5158, david.hillock@okstate.edu.

