October Gardening Topics
2022
- Post-harvest Vineyard Care - Aaron Essary, Assistant Extension Specialist, Viticulture
and Enology
Post-harvest until senescence is the time when grapevines will begin to store carbohydrates (sugars & starches) into their roots in preparation for upcoming dormancy. Once all the grapes have been picked from your vineyard, it is time to prepare your grapevines for the winter months ahead. Carbohydrates stored in the roots will help with cold hardiness and act as an energy source when the vines begin to break bud in the spring. Here are a few tips to help make sure your grapevines are going into dormancy with as much stored carbohydrates as possible.
Adequate watering. Now is the time to let your grapevines uptake water as needed. This will nurture root health and help with photosynthesis to create carbohydrates that will be sent down into the roots. This does not mean that you should saturate or flood your vineyard, just a good healthy watering.
Do NOT apply nitrogen fertilizer. One big mistake is fertilizing in the fall. This is because grapevines need to begin hardening off in preparation for the winter. Fertilizer, specifically nitrogen, will prevent this from happening.
Cease all cutting. Now is not the time to prune or hedge your vineyard. The vines need to create as many sugars and starches as possible for storage and less leaves on the canopy means less photosynthesis.
Weed Control. It is always a good idea to remove or spray weeds under vine rows. Weeds will compete with the grapevines for nutrients and water. Mow and/or spray as needed.
Remove any mummified grape clusters. Old, mummified grape clusters are a haven for fungal diseases. Remove any mummified cluster from your vineyard.
- Yucca, Yucca, Yucca - Casey Hentges, Host, Oklahoma Gardening and Bailey Lockhart,
Extension Assistant, Oklahoma Gardening
Yuccas are a great native plant. With a hardiness range from zone 5-11, they can handle Oklahoma’s extreme weather without flinching. They prefer soil with good drainage and full sun. While Yuccas are good for any low maintenance, drought tolerant garden, plant them further away from the sidewalk to avoid encountering their pointy needle-like leaves. Deer also tend to leave yuccas alone for this same reason.
A few of the popular cultivars are the Adam's Needle Yucca (Yucca filamentosa). It is hardy from zone 5-10 and offers an evergreen, strappy leaf that has filaments or threads on the edges of the leaves. In late spring, it produces large flowering spikes which are often 5-8’ tall, but can get larger. Each spike is loaded with creamy white flowers. One plant can form a clump, as offsets grow from the base of the plant.
While this plant offers a lot of texture, to add a little more color to a landscape, select a cultivar called ‘Bright Edge’. It has green leaves with yellow margins, or another cultivar called ‘Color Guard’ which offers yellow leaves with green margins.
Another common yucca is our native Yucca glauca or Soapweed Yucca. The common name soapweed came from using the root to make soap. While it has a similar form, the leaves are narrower and a little less forgiving when brushed against.
A little-known fact is a blooming yucca is a critical part of a symbiotic relationship with the Yucca moth. The yucca moth is a small white moth, which allows it to blend in with the flowers. The yucca flowers become a breeding ground for this moth since the females lay their eggs in the flowers. They leave a pheromone behind to signal which flowers have eggs to prevent others from laying in the same flower. The moth is critical in pollinating the flowers and is the only pollinator for the yucca. The larvae feed on the yucca seed once they hatch. However, there is still plenty of seed for the yucca to continue to propagate as well. It is a win-win for both the moth and the yucca.
Now all true Yuccas, including Yucca filamentosa and glauca, are in the plant family Asparagaceae. One of the most asked about plants when blooming is the red yucca, or Hesperaloe parviflora. While it is also a native and may look similar to other yuccas, it actually is not a true yucca and instead is in the Agavaceae family. It has similar thick, strappy leaves that allow it to retain moisture during drier conditions. While it will grow in a thick clump, the foliage will remain about 2-3’ tall and the flowers will shoot up to 5-6’ tall. The flower ranges from a soft pink to red. There is a cultivar called ‘Brake Light’ that provides a truer red colored flower. Not only is it a fallacy that these red yuccas are true yuccas, but also red yuccas may not be red at all as there are also yellow Hesperaloe parviflora, hardy from zones 5-10.
Exploring Yuccas in the Landscape, an Oklahoma Gardening YouTube!
- Season Extenders - David Hillock, Consumer Horticulturist
To get the most out of a garden, you can extend the growing season by sheltering the plants from the cold weather in early spring and during fall. Very ambitious gardeners harvest greens and other cool-season crops all winter by providing the right conditions. There are many ways to lengthen the growing season; your choice depends on the amount of time and money you want to invest.
Coldframes and Hot Beds
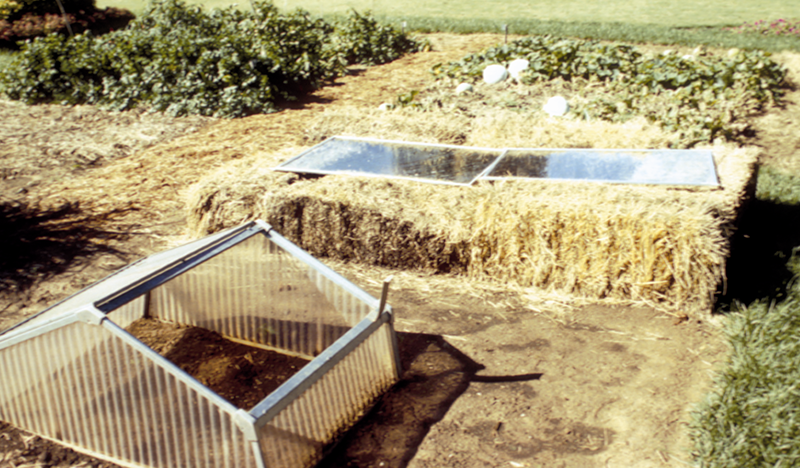
Coldframes, sun boxes and hot beds are relatively inexpensive, simple structures that provide a favorable environment for growing cool-season crops in early spring, fall and even into winter months. Some are elaborate and require a large investment, but may be the best option for those who are serious about having fresh vegetables during winter.
Coldframes and sun boxes have no outside energy requirements, relying on the sun for their source of heat. Hot beds are heated by soil heating cables, steam-carrying pipes or fresh, straw-filled manure buried beneath the rooting zones of plants. Heat is collected by these frames when sunlight penetrates the sash made of clear plastic, glass or fiberglass.
To ensure good drainage and maximum solar absorption, the ideal location for a coldframe is a southern or southeastern exposure with a slight slope. A sheltered spot with a wall or hedge to the north will provide protection against winter winds. Sinking the frame slightly into the ground also provides protection by using the earth for insulation. A walkway in front of the frame, adequate space behind the frame to remove the sash and weights to raise and lower the glass sashes make using a frame easier. Some coldframes are lightweight enough to move between sections of the garden. Another possibility is the Dutch light, which is a large, portable, greenhouse-like structure that can be moved from place to place.
Passive solar energy storage is utilized in coldframe design. For example, barrels painted black and filled with water absorb heat during the day and release it at night. The solar pod provides this type of heat storage. Other coldframe designs are very well-insulated and have a high back and a steep glass slope. Some have movable insulation that is folded up during the day and folded down at night or during extremely cold weather to protect growing plants.
A coldframe is also useful in early spring to harden-off seedlings which were started indoors or in a greenhouse. This hardening-off period is important as seedlings can suffer serious setbacks if they are moved from the warmth and protection of the house directly to the garden. The coldframe provides a transition period for gradual adjustment to outdoor weather. It is also possible to start cool-weather crops in a coldframe, either transplanting them to the garden or letting them grow to maturity in the frame.
Fall is a good time to sow some cool-season crops in frames. With adequate moisture and fertilization, most cool-season crops will continue to grow through early winter in the coldframe’s protected environment. Depending on the harshness of winter and whether additional heating is used, your frame may continue to provide fresh greens, herbs and root crops throughout cold winter months.
Growing frames can be built with a variety of materials, but wood and cinder blocks are the most common. Wooden frames are not difficult to build. Use decay-resistant wood, such as high quality cypress, or choose pressure-treated wood. Kits are commercially available and can be easily assembled; some kits even contain automatic ventilation equipment.
There is no standard size for a coldframe. Frame dimensions depend on the amount of available space, desired crops, the size of the window sash, and the permanency of the structure. Do not make the structure too wide for weeding and harvesting; 4 to 5 feet is about the maximum width to comfortably reach across. The frame sash should be sloped southward for maximum sunlight exposure and absorption.
Insulation may be necessary if a sudden cold snap is expected. A simple method is to throw burlap sacks filled with leaves over the frame sash at night to protect plants from freezing. Another method is to stack bales of straw or hay against the frame.
Ventilation is most critical from late fall through early spring on clear, sunny days when temperatures rise above 45o F. The sash should be partially raised to prevent the buildup of extreme temperatures inside the frame. Lower or replace the sash early enough to conserve some heat for evening.
It is possible to convert a coldframe to a hot bed. For a manure-heated bed, remove 2 feet of soil (for better drainage, remove more soil and add a layer of gravel). Add an 18-inch layer of straw-filled horse manure and then cover with 6 inches of good soil. For an electric-heated bed, remove 8 or 9 inches of soil. Place thermostatically-controlled electric cable in 6 to 8 inch loops on the soil, evenly spacing the cable but not allowing it to cross itself. Cover the cable with 2 inches of sand or soil, and then place hardware cloth on top to protect the cable. Finally, cover this with 4 to 6 inches of good soil.
- Raking Basics - David Hillock, Consumer Horticulturist
Fall is soon upon us, and it is time to begin thinking about what you will do with all those leaves. Just bagging them and letting them go to the landfill is a waste of our tax dollars and of a valuable garden resource. Instead of bagging them and hauling off to the dump this year consider these suggestions.
Use as a Mulch – An easy way to get rid of leaves is to simply rake them onto the perennial beds as a nice winter mulch. Some say that leaves may suffocate your plants but use your good judgment. Small leaves generally will not offer any threat, but huge leaves, such as sycamore, might.
Compost Them – Place them in the compost pile along with other garden plant material. You don’t need a special compost bin to accomplish this process. A big hole dug behind the garage or some other inconspicuous place works nicely. Fill the hole with lots of leaves and other garden plant material.
Mow 'Em – This is the method I like to use. I simply mow over them as often as necessary before they build up too deep. The chopped leaves return valuable organic matter and nutrients to the soil. If you use a mower with a bag attachment you can capture the chopped leaves and then distribute them as needed. They work well as an excellent mulch, compost fodder, or can be worked into your vegetable garden.
Leaf Power – If you have tons of leaves, you may consider buying or renting a vacuum-shredder. This is more effective than just blowing them around with a blower. Vacuum-shredders suck up the leaves, chop them, and then collect them into a bag. Use as described above. Remember, however, that shredders, blowers, and choppers work well only when the leaves are nice and dry. If they're too wet, they'll just clog.
Back to Nature – If you own a wooded area or large property where you can dispose of leaves, go for it. However, remember that too many leaves can suffocate existing plants, so spread them out a bit.
- House Plant Pests - David Hillock, Consumer Horticulturist
Insect pests can occasionally be a problem and can result in plant stress or death.
An occasional “shower” will benefit most plants. Small plants can be showered with water from the spray head at the kitchen sink, and larger plants can be showered with water in the bathtub or shower. The water spray should not be too hard, and it should be tepid in temperature. This will remove dust, dirt, and many insects and pests that might affect the plant. Always inspect plants for pests as you water and care for them.
If insects or pests are a problem, submerging the plants in a tub of water for about 30 minutes may cause the insects to rise to the surface of the water where they can be skimmed off. Enclose the pot in a plastic bag to keep the potting medium in place during this treatment.
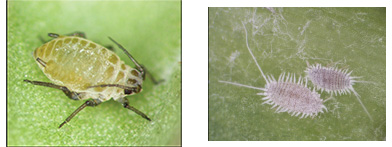
Aphids (plant lice) and mealybugs (cottony) are common insect problems of houseplants. Insecticides properly diluted and applied will eliminate most infestations. Then, usually by early isolation and retreatment, the insect infestation can be controlled with minimum insecticide treatments.
Figures 1. Aphid (left) and mealybugs (right) are common insect problems (Photos highly magnified.)
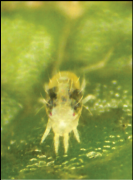
Spider mites can also damage houseplants. These are red, black, brown, or tan pests that are about the size of a dust particle. They usually feed from the undersides of the leaves causing the top side to turn pale. They are a greater problem during periods of high temperature and low humidity. Showering your houseplants once or twice a month will help control these tiny pests.
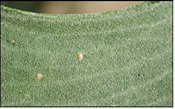
Figure 2. Spider mites (left, photo highly magnified) are very tiny, but can kill houseplants. Scale insects (right photo) suck plant fluids, leaving a sticky residue on nearby surfaces.
Where only a few plants are involved, an alcohol-soaked cotton swab can be used to wipe off any aphids, mealybugs, and scale insects.
Before treating houseplants with an insecticide, regardless of chemical, put them where there is plenty of ventilation. Allow them to dry thoroughly before bringing them back into the room. Always follow label directions.
Systemic insecticides formulated for homeowner use can be sprinkled in the pots with growing plants to control most insect problems. Consult your local garden center, greenhouse, or local OSU Extension Office for the latest pest control recommendations.
Do not apply pesticides without a proper reason. Read and heed all label warning and directions. Do not treat houseplants with pesticides if people with respiratory problems live in the home. Be sure to keep all pesticides and plants that have been treated with pesticides out of the reach of children and pets.
- Right Plant, Right Place - David Hillock, Consumer Horticulturist
Fall is a great time to plant many landscape plants. The cooler temperatures are less stressful on plants allowing them to put more energy into root development. As you choose a new spot for those plants, be sure to take into consideration their mature size. One of the most common design mistakes I see in the landscape is improper placement of plant materials relative to their mature size. It is so easy to do too. I know I have done it on occasion. Sometimes it is from ignoring the mature size, wanting to make something fit in that one space; after all, it looks great in that particular spot! Sometimes it is just ignorance or not paying attention to the plant label. In any event, it is important to realize that more than likely the plant is going to get much bigger than it currently is in that nursery container.
The two most common misplacements I see are foundation or corner plantings and walkway or edge plantings. This mistake usually leads to butchering, resulting in deformed plants that many refer to as “meatballing.” The usual culprits, and by no fault of their own, are hollies, crapemyrtles, and junipers to name a few. Most of these become large plants as they mature. While there are cultivars or varieties available that grow smaller, the common varieties found in many garden centers will grow quite large. For example, I don’t know of very many spreading junipers that only grow 2-3’ wide; yet we plant them only two feet from the edge of a sidewalk. Most spreading junipers will spread 6-8’ wide in a short amount of time. Knowing they will spread that much means they should not be planted within four feet of the edge of the sidewalk (measuring from the center of the plant).
Another example is hollies. Burford holly is a very popular form. It is a tough, beautiful plant, and quite cute in small containers in the nursery. But did you know it can reach at least 10’ tall and just as wide? And if left unchecked can reach heights of 20+ feet. Maybe you knew that and had the intention of pruning it each year to keep it in bounds. But that can get old after a while, or you move, and the new owner is not aware of the care you were giving it or the ultimate size of that plant. Eventually you end up with this monstrous shrub covering your beautiful picture window. Usually, it is best to not depend on heavy pruning to keep plants within a desired size. Rather choose plants that “fit” and are in scale with the space.
So, as you venture to the garden center this fall to buy your plants, be sure to look at the label or do a little research to make sure the plant you are buying will be comfortable in the space you would like to plant it.
- Fall - A Good Time to Control Broadleaf Weeds - David Hillock, Consumer Horticulturist
Summer temperatures make it too risky to use the broadleaf postemergence herbicides due to the volatility and threat of drift, which could then damage desirable plants in the landscape. However, the cooler daytime temperatures associated with fall make it an excellent time to think again about controlling broadleaf weeds in the yard. Dandelion and other broadleaf weeds are easily controlled with post emergence herbicides such as those that contain a Trimec solution or other combination formulas. Remember to spray early in the day when winds are low and before temperatures begin to get too warm. Care should be used when applying these herbicides around desirable landscape plants. Do not over apply especially around tree and shrub roots. Spot spray when possible as it is not necessary to do a blanket cover spray when only few weeds exist in the yard. Spraying young weeds as they first appear this fall will be more effective than waiting until the foliage is more mature. Mature foliage resists the herbicide more easily than the younger shoots. Always read and follow label directions!!
- Plant Spring-Flowering Bulbs Now! - David Hillock, Consumer Horticulturist
The latter part of this month and into November is the time to plant spring-flowering bulbs such as tulips, daffodils, hyacinths, etc. Be sure to get to the garden centers early so you can pick out the largest and healthiest of bulbs. They will bloom better for you than the smaller, discount types. Bulbs may be in short supply this year due to unfavorable weather conditions in areas where they are produced, as well as affects from the pandemic, so that is another reason to seek out good bulbs early.
Most bulbs should be planted to a depth that is about 2 times the diameter of the bulb. Be sure to plant your bulbs in well-drained soil; most will rot in our heavy, wet, clay soils during the winter if proper drainage is not provided.
To increase the spring bulb display, plant pansies at the same time. Pansies don’t mind the cold weather and can even provide a little extra color during the winter months. Come spring, they really take off and provide an understory of color to the overstory of color provided by the spring bulbs.
- Preparing Soil for Spring Gardens - Lynn Brandenberger, Extension Specialist
Most of us have probably heard the old adage that the early bird gets the worm, but have you ever considered how starting soil prep in the fall for your spring and summer garden might pay big dividends? As mentioned in an earlier article, fall is a good time to take stock in what has occurred during the summer and it is also a great time to add organic matter in some form to the soil.
There are several ways to add organic matter. If you have a good source of manure then adding it in the fall for a spring garden will allow time for mother nature to break down any pathogens (pathogenic bacteria, etc.) that might cause food safety concerns. After adding manure go ahead and till it into the soil so it will have time to begin breakdown and release of its plant nutrients in the soil.
After applying manure we have an opportunity to plant a winter cover crop. I would recommend either purchasing a commercially blended cover crop seed mix or use winter wheat (cereal grass) along with one or more winter legumes. Cereal grasses are great at producing organic matter that takes a little longer to break down making them good for building up the organic matter in your soil. Add to this some winter legumes and you’re ready to go.
Winter legumes along with their corresponding bacterial partners (rhizobacterium) have the capability to capture nitrogen in the air and “fix” it in the plant. In the spring, once the legume is tilled into the soil, nitrogen is released slowly for your crop plants to use. How much nitrogen? Most soil scientists would estimate somewhere between 50-100 lbs. of nitrogen per acre (roughly a tenth to nearly one quarter of a pound per 100 square feet).
You can purchase pre-inoculated legume seed which makes it very simple or you can inoculate it yourself with the proper rhizobacterium. Here is a short video on how to inoculate small amounts of seed: https://www.youtube.com/watch?v=GP8oS5EdPMQ.
Regarding which winter legumes to use in Oklahoma, crimson clover is a favorite because it not only provides nitrogen but it is beautiful during its spring bloom. We’ve also used Austrian winter pea and it is amazing to see it climb up the cereal grain that it is planted with to show off its pastel pea-like flowers. I’m certain there are others, but those are two of my favorites.
Since you likely tilled up the garden or field to incorporate the manure, you can broadcast the cover crop seed by hand or with a broadcast fertilizer spreader. A light raking will provide good seed to soil contact. If you can time all of this to coincide with a rain soon after seeding, it should begin to emerge quickly. If the weather is dry, then you may want to consider overhead watering to get germination started.


