March 2024 Hort Tips
View the March 2024 Hort tip articles below.
Applying Dormant Oils for Winter Insect Control
David Hillock
For home gardeners and fruit growers an important insect management tool is dormant oil application. Dormant oil is a refined petroleum product formulated for use on trees and shrubs. This refers to the time of application which should be late winter or early spring. Applications should be made when temperatures are above freezing and before bud swell and bud break before new growth forms. Ideal temps are between 40 and 70 degrees.
If applied too early, before hardening off, the trees can sustain winter injury. Also, if the temperature is too low the oil will not mix well in solution, and you will not get adequate coverage needed to control overwintering insects. Late February through March should be a good time to make these applications, although check the weather and make sure there will not be any freezing temperatures or rain for a few days after applications.
Dormant oils control scale insects, aphids, and mites that are overwintering on the trees. The oil must be applied with enough water to get thorough coverage (read label recommendations). Coverage is very important so that the spray can reach in between the cracks and crevices of the bark where many insects hide. The oil coats the insects and fills the spiracles. Insects use their spiracles to breathe so when they are blocked, they smother. Dormant oils will suppress insects by killing overwintering adults and eggs which will slow the seasonal build up in the spring. This is well worth the extra time. Some insects controlled by dormant oils include aphids, scales, and mites.
Applications should be made to apples, pear, plum, pecan and crabapples. Peaches, nectarines, apricots and plums often do not require dormant oil sprays, but if certain insect pests have been an issue in the past it could be beneficial. Dormant oils can also be beneficial for shade trees and woody ornamentals. Consult your label before application to make sure the plant is listed. Some plants are sensitive to dormant oil applications.
Precautions: Do not apply too early or too late. Avoid temperature extremes. Avoid using on plants that are oil sensitive. There will be a list on the label.
Dormant oils will kill annual flowers; do not make applications to trees close to annuals. Do not apply in combination with sulfur containing pesticides such as captan. This will cause plant injury.
Benefits far outweigh the negatives. It is inexpensive and less toxic than other sprays used to control these pests with little toxicity to birds and mammals. This will provide your plants with a jump start into spring.
Dormant oils can be purchased at any garden center and are relatively inexpensive. Remember to read the label and follow all label recommendations!
Pruning Roses
Casey Hentges, Associate Extension Specialist
Bailey Singleton, Extension Assistant
A common question that we often get is “when do I need to prune my roses.” Unfortunately, it can be somewhat of a complicated answer and largely depends on the type of rose.
Hybrid Tea roses are some of the most popular roses, with a size of 2-6 feet in height. These are the roses that are most noted for having a large flower on each stem and are often grown for cut flowers. Hybrid teas are often considered to be higher maintenance and require more severe pruning mainly because winter can cause some of the canes to die back. Roses in northern Oklahoma will benefit from a heavy mulch layer of 8-10” around the plant during the winter. If they were mulched heavily this past winter, it is time to pull back that mulch as the temperatures begin to warm up.
Another popular type of rose is the shrub rose. These exploded in popularity with the low maintenance knock-out rose that was introduced into the market in 2000. These floribunda type roses produce a vigorous shrub with prolific bloom clusters. Because they are often hardier than hybrid teas, we don’t see as much winter damage on the canes.
Grandifloras, which are crosses between floribunda and hybrid tea roses, are also vigorous and hardier than hybrid teas but have even shorter stems than floribundas. Queen Elizabeth is a popular grandiflora.
Going down in scale next are polyanthas and dwarf roses.
Regardless of type, for roses that bloom through the season, March is the best time to prune them. This is because new growth is beginning to emerge and is easy to see. Waiting until some of the vegetation begins to emerge can help identify if there are any dead canes that need to be removed first.
Hybrid tea roses can be pruned back to anywhere from 6-24 inches. We always want to promote an open canopy due to their susceptibility to fungal diseases. Having an open center will promote better air circulation and reduce moisture on the leaves.
The grandifloras, floribundas, polyanthas, and other shrub-like roses don’t require as severe pruning. The most important consideration is to remove any dead or diseased canes to help maintain the overall shape and health of the plant. There is one disease that has drastically impacted the rose and that is Rose Rosette. Because this plant virus is transmitted by sap, we want to make sure we are being cautious with our pruners and sanitize them between each shrub. To learn more about rose rosette and the symptoms visit fact sheet EPP-7329 – Rose Rosette Disease.
For ramblers and other climbers that bloom mainly in the spring, wait until after they bloom to prune. Then cut back the side shoots with spent flowers and any older canes, leaving enough new canes to cover the desired area.
The other thing to keep in mind is if the rose was planted in the last year, it is best to do minimal pruning to allow it to establish itself.
Also, because we can still get freezing conditions and we don’t want to promote growth just yet, it is best to wait until April to apply fertilizer.
For more information about rose maintenance, check out fact sheet HLA-6403 – Roses in Oklahoma and the Oklahoma Gardening YouTube video, Pruning Roses.
Establishing a New Vegetable Garden
David Hillock
In the past few years there has been a surge in gardening activity and a desire to be outdoors. And why not? Gardening and being out in nature can be so rewarding and has proven to be therapeutic. If you are considering gardening for the first time or just want to get better at it, here is some information that will help get you started.
Site Selection
The following is a list of considerations when selecting a site for the vegetable garden:
- Sun exposure: select a site that receives at least 6 hours of direct sunlight each day. Southern exposures are ideal for greatest sun incidence.
- Soil: Well-drained soils such as sandy loam provide ideal conditions for growing vegetables. Soil pH near 6.6 to 6.8 is optimal. Avoid steep slopes where erosion will be a problem.
- Air flow: avoid low-lying areas as these tend to collect cold air which slows germination and plant development in spring.
- Avoid placing a vegetable garden near walnut trees. Walnuts exude a substance called juglone from their roots which is allelopathic, meaning it can kill other plants. Tomatoes and other solanaceous plants are highly sensitive to juglone.
- Make sure the site is situated near a water supply.
Removing Vegetation
It is important to start with a clean slate when preparing a new garden bed. And this means removing existing vegetation and controlling weeds. Usually, this is a chore for the summer prior to planting. There are several methods available to kill off vegetation. The most common method is to apply an herbicide, but there are other non-chemical methods such as solarization and smothering.
Solarization is a simple technique that captures radiant heat energy from the sun and uses that heat to kill seedlings and weed seeds, as well as some soil-borne disease organisms. Sheets of plastic are used to trap solar heat. Solarization is commonly used to kill weed seeds in areas where the vegetative layer has been removed.
To smother weeds, cover the soil with black plastic, or several layers of newspaper. Carpet or boards have also been used for smothering.
Solarization can be combined with other control methods. For example, an herbicide may be used to make the initial kill, then solarize to control subsequent seedlings and kill seeds in the soil. Solarization can also be combined with the application of soil amendments and fertilizers. In fact, solarization can speed up decomposition of organic matter, releasing soluble nutrients into the soil.
Whatever method is used, it is ideal to control perennial weeds before establishing a new garden. It will be much easier to manage them before you have the area planted with vegetables.
Soil preparation
Once the vegetation is removed, till the soil to loosen it. This is a good time to add manure or other organic material. To preserve soil structure, avoid tilling when the soil is too wet. To determine if the soil is too moist for tilling, grab a handful of soil and squeeze it slightly. If it sticks together in a ball, it is too wet. If it crumbles easily, it is ready.
How to Collect Soil for Testing
Soil tests should be included as part of garden preparation. It is easier to amend soils and add nutrients before planting, rather than after. Soil tests collect information on soil nutrients and pH.
When collecting soil samples, test areas with drastically different soil conditions separately. To get started you will need a tool for collecting small samples. A soil probe is a great tool for sampling if you have one. A shovel or even a small bulb planter can also be used. You will also need a bucket for sampling. You should obtain a representative sample for each area being tested. To do this, collect several samples from across the entire area being sampled and combine them into a single, representative sample. Take samples to a depth of six inches. In a large garden, as many as 15 to 20 cores should be taken.
Make sure to use a clean bucket that does not have any cleansers in it. Many cleaners contain chemicals that could alter your soil test results. Mix samples taken from one area together, then fill the sample bag for analysis.
Sample bags are available at your county extension office, where soil samples may also be submitted. The samples are sent to the OSU Soil, Water, and Forage Analytical Laboratory for testing. Tests cost $10 each, and evaluate soil pH, nitrate nitrogen, phosphorous and potassium contents. You can also request micronutrient tests as well as organic matter content and other specific tests. Test results include fertilizer recommendations specific to the type of vegetation growing on the site. Be sure to mark the proper space on the sample label indicating the type of area sampled, such as turf or garden.
Extension Leaflet L-249 contains detailed information on collecting soil samples.
Don’t forget that even if you don’t have a large space for an in-ground garden, container gardening can also be done successfully. For information about growing in containers see our fact sheet HLA-6458 – Container Gardening.
Spring Cleaning
David Hillock
Cleaning up the garden in late winter/early spring is a common practice. One reason for this is to remove debris that was infected with unwanted diseases and insects to reduce the chances of those organisms infecting new growth. Another reason is to allow the sun to reach the ground and warm it up encouraging new growth and provide space for the new growth. And another reason is some people just don’t like the look of all the old stems and foliage in the garden.
Recently, however, we have learned more about these dormant habitats and the importance they have on our native bees and beneficial insects. Many of our native bees are solitary bees and some nest in standing spent plant stems. Cavity nesting bees and some solitary wasps use hollow or pithy stems to construct their nests.
The folks at the Lurie Gardens in Chicago have been experimenting with and learning a lot about these habitats. The horticulturists at the Lurie Gardens say we still have a LOT to learn but have shared what they do know.
They have found that plants that have sturdy and fibrous stems with pithy, hollow centers that are about 1/8” to 5/16” in diameter are great for these stem nesting bees. The bees are usually nesting in the lower 24 inches of the stem. By leaving these stems somewhat intact throughout the year we are preserving their habitat and hopefully increasing a declining population of important pollinators. Leaving stubble that is 18-24 inches high in the garden may seem unsightly at first, but as the new growth develops in the spring, those stems will soon be hidden and may even provide additional support to the new growth.
Plants we know are host plants for native bees and solitary wasps include – Monarda fistulosa, Rudbeckia sp., Echinacea sp., Solidago sp., Aster sp., Asclepias incarnata, Vernonia sp., Veronicastrum virginicum, Agastache sp., and Hydrangea arborescens. Other species that the Lurie Gardens are experimenting with include Phlox paniculata, Kirengeshoma palmata, Thalictrum sp., Eutrochium maculatum, and Actaea sp.
Additional suggestions by the team at the Lurie Gardens to help preserve this valuable population of pollinators include – first, leave plant material standing through the winter. Second, identify plants that are desirable habitat and cut them high in early spring, leaving 18‑24 inches of stem stubble. Third, leave the stem stubble undisturbed for at least a year and a half. Fourth, repeat! Try to use the same individual plants each year – consistency is really helpful. Fifth, don’t just stick to the known host plants. Try a few others that might look like the right fit, because we still don’t know all of the potential habitat. And sixth, observe and share your findings!
Plants that don’t have these pithy, hollow stems can be cut back now. That might include many of your ornamental grasses and other perennials. New growth will begin to emerge soon on some grasses and perennials; waiting until new growth is several inches high will make it difficult to remove dead foliage without damaging the new growth; debris that has not been infected with pests can be left lying in the garden as a mulch or thrown into the compost pile to be used later as a soil amendment.
Irrigation System Maintenance: Spring Start Up
David Hillock
Now is a good time to prepare your irrigation system for the season. Before turning it on, make a visual inspection of the sprinkler heads. Check for broken heads or covered up heads; free heads, make height adjustments, and be sure spray heads are still properly orientated. Check all valve boxes for rodent nests and debris.
Make sure there is power to the controller and set stations for proper run times. Turn the main water source on slowly to fill the system. If you have manual drain valves, leave them open to allow air to escape as the pipes fill with water; when water starts coming out the drain valves, close them.
Turn on each irrigation zone one at a time or set your controller to run through each zone using a test cycle setting. If choosing to run a test cycle of each zone, set a time limit long enough to observe each zone and mark needed repairs, about three minutes.
While each zone is running, walk through the yard and check each sprinkler head, noting any that require attention. Flag or mark problems to make them easier to identify when making repairs; look for leaks, make sure all heads provide adequate coverage to their area and are closing properly. If the system is not running properly, additional troubleshooting should begin, and repairs made. If major issues are discovered, an irrigation specialist may be needed to fix the problems. Replacing backup batteries could also be done at this time.
Irrigation technology has come a long way over the past several years so if your system is old and not as efficient, now would be a good time to consider upgrading the system. Smart controllers, such as climate-based controllers and soil moisture sensor controllers, provide easier access and more precise control of the system. Add-ons that also make systems more efficient are soil moisture sensors, rain and freeze sensors, and wind sensors. Smart sprinkler heads that provide better coverage without waste are also available.
Making sure the system is running properly and efficiently now will ensure your landscape plants will be healthy going into the growing season.
Planting Bare-Root Plants
David Hillock
Bare-root plants are plants not growing in a container and are packaged and sold with a moist material surrounding their roots to protect them until planting. Because there is less shipping material and weight, bare-root plants can be much cheaper than plants growing in containers or soil. Because bare-root plants are sold while dormant, there is less chance they will be damaged or stressed during shipping too.
Several species of trees, shrubs, fruits, and perennials are offered as bare-root plants. Bare-root plants can be purchased in winter and should be planted in February or March. Bare-root or packaged plants should be dormant (not showing new growth). The bare-root plant is often prepackaged in a colorful bag. Open the bag immediately and dampen the roots until planting. At planting remove all bags, strings, or wires.
Never leave roots exposed to air. Very fine root hairs, which are not visible to the naked eye, are responsible for moisture and nutrient uptake and are killed when exposed to dry air for even a very short period. Keep the roots damp and covered while preparing the planting hole to protect the fine root hairs.
Plants should be planted at the same depth at which they were growing in the container or field nursery. There is a texture and color change between the trunk or stem and the roots. The base of the plant should not be covered with more than about one inch of soil. Planting too deep is a major cause of plant failure, especially in poorly drained clay soil.
Holes for bare-root plants should be dug large enough to accommodate the roots without crowding or twisting. The hole should be no deeper than the original root depth and at least twice the spread of roots. Broken and badly damaged roots should be removed. A mound or cone may be made in the center of the hole to accommodate the spread of roots and allow the tree or shrub to rest at the proper depth while backfilling the hole.
Work the soil under and around the roots to remove air pockets. Firm the soil while filling until the hole is three-quarters full, and then fill the hole with water. This will settle soil around the roots. After the water has soaked in, finish filling the hole with soil and water again. If the soil around the plant settles, bring it back up to grade with additional soil.
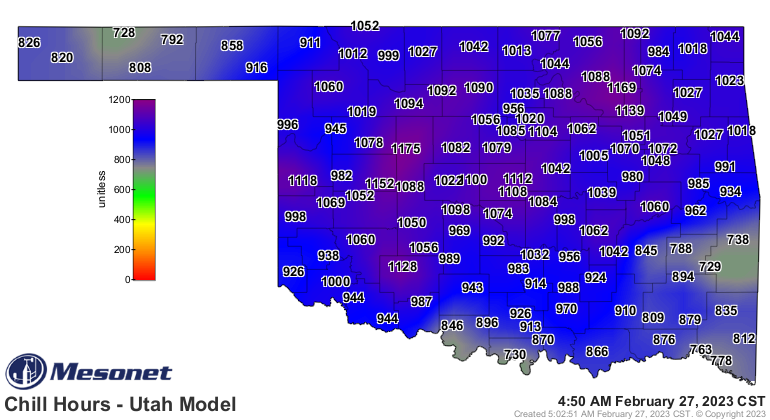
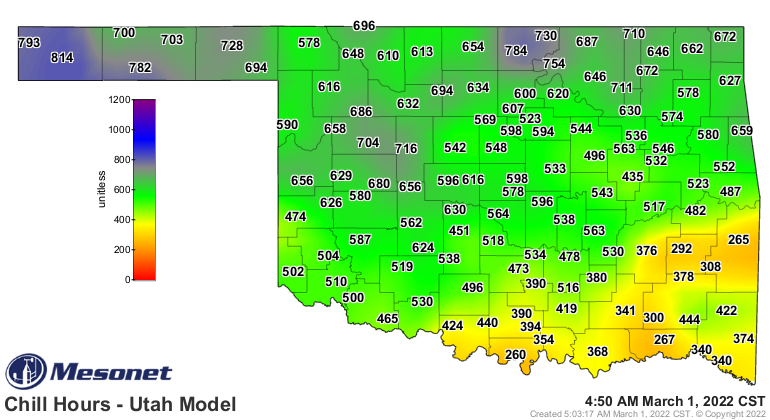
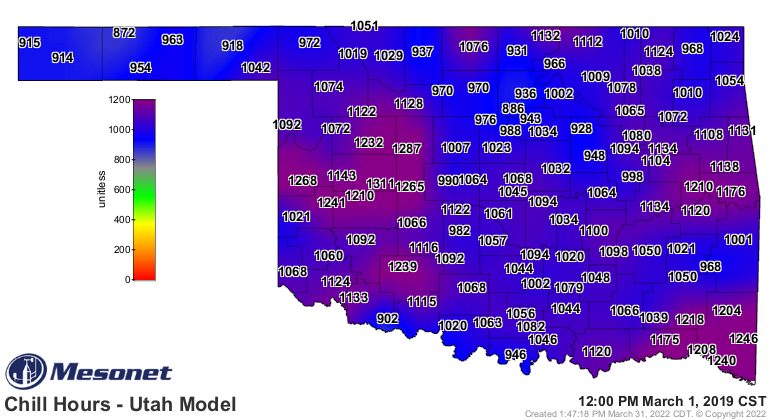
Mesonet Chilling Maps Available to Public
Becky Carroll, Senior Extension Specialist
Recently Mesonet has made the chilling hours maps available to the public. To find the maps on the Mesonet page (Mesonet Website), select Agriculture and then select Horticulture. Under the Horticulture page, selecting either peach or pecan will give you the chilling hours map option.
Below are maps from 2023, 2022, and 2019. You can see the state was severely lacking chilling hours in 2022. Bloom times were extended on some fruit crops, others missed their cross-pollination window, and overall fruit production was off.
Historically we see about 800 hours or more all along the red river in March and around 1200 hours at the northern edge of the state.
The following information is taken from an article that was written for Hort Tips in January 2021 but explains why chilling hours are important.
Similar to myself and other humans, most fruit trees and pecans need rest to function properly. This rest period is called dormancy. The trees need exposure to cold temperatures to break this dormancy and start growth properly in the spring. This rest period is one way the plant protects fruit buds by delaying growth until the warm temperatures arrive in the spring. Fruit and pecan trees require chilling hours for fruit and leaf buds to break dormancy.
Now what makes a chilling hour? For each hour of temperatures between 34 and 54 degrees, chilling hours are accumulated at different rates, but the ideal temperatures are between 36 and 48. If temperatures drop below that 34 degree mark, no chilling is added. And as temperatures get warmer, those accumulated chilling hours may be reversed or lost. Hours over 60 degrees will be subtracted from the total number.
The Utah Model that we use to figure chilling hours:
- 1 hour below 34 = 0 chill hours
- 1 hour between 34.01 and 36 = 0.5 chill hour
- 1 hour between 36.01 and 48 = 1.0 chill hour
- 1 hour between 48.01 and 54 = 0.5 chill hour
- 1 hour between 54.01 and 60 = 0.0 chill hour
- 1 hour between 60.01 and 65 = -0.5 chill hour
- 1 hour above 65.01 = -1.0 chill hour
We begin accumulating hours after the first freeze. If temperatures warm and begin to lose hours, the accumulated number of hours will never go below 0 hours. So it will never be negative. If we have extended periods of warm temperatures, many of our accumulated hours can be lost. Once the plant reaches that “magic” number of chilling hours needed to break rest, they will enter into a second stage of dormancy until sufficient warm temperatures occur that are favorable for bud growth. In Oklahoma, we often reach the required number of chilling hours in mid-winter, but normally cold temperatures will keep buds from swelling until late February or March.
Some fruits require very little chilling, like figs and some grapes. They may only need about 100 hours of chilling while some apples and cherries may need around 1000 hours. It’s best to plant fruits that have similar chilling requirements as what is normally received for your area. Low-chill peaches for example are best planted in southern Texas or Florida where there is little chilling in any given year. Oklahoma normally receives higher chilling hour totals so it’s best to use fruits that require higher numbers of hours. A low-chill peach may satisfy the chilling needed early in the winter and then when a few warm days occur, the peach will begin to grow or bloom. This leaves the tree susceptible to cold injury and will likely not have a peach crop.
Pecans can be tricky. Each native pecan is genetically different and may have different requirements. A native pecan tree in Oklahoma may require around 1000 chilling hours and a native in Mexico may only need 100. Using what is adapted to your climate is important to have a productive tree. The range for improved varieties varies greatly.
What happens when we have a very warm winter and don’t have enough chilling? Trees may have a delayed or very long bud break time, foliage may be sparse, flowers may bloom erratically causing pollination problems, fruit set can be reduced, and quality may suffer.